Ignite Your Designs: Creating Flaming Hot Fire Text in Photoshop
Transforming text into fiery flames can add an intense and captivating element to your designs. With Adobe Photoshop, you can easily achieve this effect by combining various techniques and tools. In this comprehensive guide, we’ll explore step-by-step instructions for creating flaming hot fire text in Photoshop, from selecting the right font to adding realistic fire effects and finishing touches.
1. Selecting the Right Font:
Choosing the appropriate font is crucial for creating flaming hot fire text in Photoshop. Opt for bold and impactful fonts with sharp edges and strong lines to enhance the fiery effect. Fonts with a distressed or rugged appearance can also complement the fiery theme. Experiment with different font styles until you find one that conveys the desired intensity and energy.
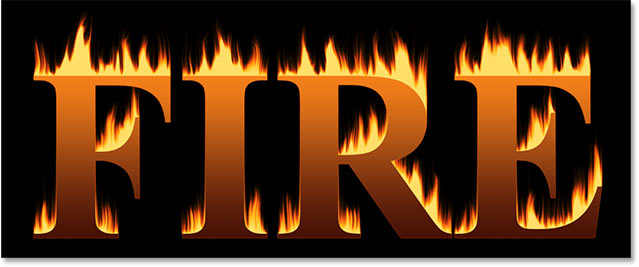
2. Creating the Text Layer:
Start by creating a new document in Photoshop and adding your desired text using the Text tool. Choose a large font size to ensure that the flames have enough space to be visible. Position the text in the center of the document or wherever you prefer. Once the text layer is created, rasterize it by right-clicking on the layer and selecting “Rasterize Type.” This will convert the text into a regular pixel layer, allowing you to apply various effects.
3. Adding Base Fire Colors:
To begin creating the fire effect, select the Gradient tool and choose a gradient that transitions from vibrant red or orange to bright yellow. Apply the gradient to the text layer by clicking and dragging across the text area. Adjust the angle and scale of the gradient as needed to achieve the desired look. This will create a base layer of fiery colors for the text.
4. Applying Layer Styles:
Next, apply layer styles to enhance the fiery effect of the text. Right-click on the text layer and select “Blending Options” to access the Layer Style dialog box. Experiment with different blending modes such as Overlay, Screen, or Linear Dodge (Add) to blend the fire colors with the underlying text. Adjust the opacity and fill settings to control the intensity of the effect. You can also add inner and outer glows to simulate the glowing embers of a fire.
5. Adding Fire Texture:
To add texture to the flames, search for fire texture images online or use Photoshop’s built-in brushes to create your own. Create a new layer above the text layer and apply the fire texture using the Brush tool. Experiment with different brush sizes and opacity levels to achieve a realistic and dynamic fire effect. You can also use layer masks to blend the texture seamlessly with the text.
6. Adding Depth and Detail:
To add depth and dimension to the fire text, duplicate the text layer and apply a Gaussian Blur filter to the duplicate layer. Experiment with different blur settings to achieve a subtle glow around the edges of the text. You can also use the Burn tool to darken certain areas of the text and the Dodge tool to brighten others, adding highlights and shadows for a more realistic appearance.
7. Finishing Touches:
Finally, add finishing touches to perfect the flaming hot fire text. Experiment with additional layer styles, filters, and adjustment layers to enhance the overall look and feel. Consider adding sparks, smoke, or other fiery elements to make the text even more dynamic and visually striking. Once you’re satisfied with the result, save your design as a high-resolution image for use in your projects.
8. Conclusion:
In conclusion, creating flaming hot fire text in Photoshop is a fun and creative way to add drama and excitement to your designs. By following these step-by-step instructions and experimenting with different techniques, you can achieve stunning fire effects that will ignite the imagination of your audience. So unleash your creativity and let your designs burn bright with fiery intensity!


