Mastering the Art of Realism: A Comprehensive Guide to Creating a Burnt Edge Effect in Photoshop

In the realm of digital image editing, mastering the art of realism can elevate your creations from ordinary to extraordinary. One technique that adds depth, drama, and visual interest to images is the creation of a burnt edge effect. Whether you’re striving to achieve a weathered, vintage look or adding a touch of intrigue to your digital compositions, Photoshop provides a wealth of tools and techniques to help you create stunning burnt edge effects with precision and creativity. In this comprehensive guide, we’ll explore step-by-step methods, expert tips, and creative strategies to help you master the art of creating a burnt edge effect in Photoshop.
Understanding the Burnt Edge Effect
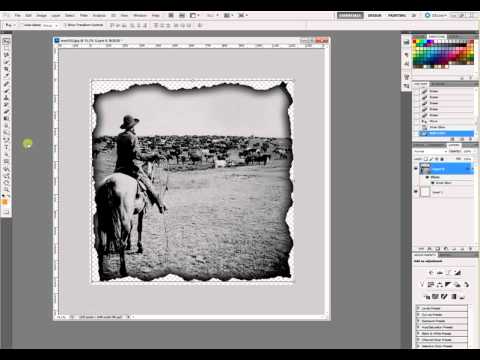
The burnt edge effect simulates the appearance of a photograph or paper that has been singed or scorched along its edges. This effect can evoke a sense of nostalgia, add depth and texture to digital compositions, or convey a sense of drama and intensity. Whether used in vintage-inspired designs, fantasy artwork, or photo manipulations, the burnt edge effect offers endless creative possibilities for digital artists and photographers alike.
Method 1: Using Brushes and Layer Masks
One of the most versatile methods for creating a burnt edge effect in Photoshop is by using brushes and layer masks. This method allows you to selectively apply the burnt edge effect to specific areas of your image, giving you precise control over the intensity and placement of the effect. Here’s how to create a burnt edge effect using brushes and layer masks:
- Select a Burnt Edge Brush: Start by selecting a suitable burnt edge brush from your brush presets or download one from a reputable source online. Look for brushes with realistic textures and irregular shapes to achieve a convincing burnt edge effect.
- Create a New Layer: Create a new layer above your image layer by clicking on the “New Layer” button at the bottom of the Layers panel.
- Brush Along the Edges: Using the selected burnt edge brush and a black color, brush along the edges of your image where you want the burnt effect to appear. Vary the brush size and pressure to create irregular and organic-looking burnt edges.
- Adjust Layer Opacity and Blend Mode: Once you’ve brushed along the edges, adjust the opacity and blend mode of the layer to blend the burnt edges seamlessly into your image. Experiment with different blend modes, such as Multiply or Overlay, to achieve the desired look.
- Refine with Layer Masks: If necessary, refine the burnt edge effect using layer masks. Use a soft brush and the Eraser tool to selectively remove or soften areas of the burnt edges, ensuring a natural and realistic appearance.
Method 2: Using Gradients and Layer Styles
Another effective method for creating a burnt edge effect in Photoshop is by using gradients and layer styles. This method allows you to create gradual transitions from the unaffected areas of your image to the burnt edges, adding depth and dimension to the effect. Here’s how to create a burnt edge effect using gradients and layer styles:
- Create a New Layer: Start by creating a new layer above your image layer.
- Apply a Gradient Fill: Select the Gradient tool from the toolbar and choose a black-to-transparent gradient. Click and drag across the edges of your image to apply the gradient fill, creating a gradual transition from black to transparent along the edges.
- Apply Layer Styles: With the gradient-filled layer selected, open the Layer Styles dialog by double-clicking on the layer or right-clicking and selecting “Blending Options.” Apply a Bevel and Emboss layer style to the layer, adjusting the settings to create a subtle raised edge effect.
- Adjust Layer Opacity and Blend Mode: Once you’ve applied the layer styles, adjust the opacity and blend mode of the layer to blend the burnt edges seamlessly into your image. Experiment with different blend modes and opacity levels to achieve the desired intensity of the effect.
- Refine with Layer Masks: If necessary, refine the burnt edge effect using layer masks. Use a soft brush and the Eraser tool to selectively remove or soften areas of the burnt edges, ensuring a natural and realistic appearance.
Method 3: Using Textures and Blending Modes
A third method for creating a burnt edge effect in Photoshop is by using textures and blending modes. This method allows you to overlay realistic burnt textures onto your image and blend them seamlessly using blending modes and opacity adjustments. Here’s how to create a burnt edge effect using textures and blending modes:
- Find a Burnt Texture: Start by finding a suitable burnt texture online or create your own by photographing burnt paper or other textured surfaces.
- Place the Texture: Open the burnt texture in Photoshop and drag it onto your image document. Resize and position the texture layer over the areas where you want the burnt effect to appear.
- Blend with Blending Modes: With the texture layer selected, experiment with different blending modes, such as Multiply or Overlay, to blend the burnt texture seamlessly into your image. Adjust the opacity of the layer to control the intensity of the effect.
- Mask and Refine: Use layer masks and the Brush tool to mask out any unwanted areas of the burnt texture or refine the edges of the effect. Blend the burnt edges seamlessly into your image by painting with black or white on the layer mask.
- Add Depth with Adjustment Layers: For added depth and realism, consider adding adjustment layers such as Levels or Curves above the texture layer. Adjust the levels or curves to darken the burnt areas and enhance the contrast, making the effect appear more realistic.
Conclusion
In conclusion, creating a burnt edge effect in Photoshop is a versatile and creative technique that adds depth, drama, and visual interest to your digital compositions. Whether you’re aiming for a weathered, vintage look or adding a touch of intrigue to your designs, Photoshop provides a myriad of tools and techniques to help you achieve stunning burnt edge effects with precision and creativity. By mastering methods such as using brushes and layer masks, gradients and layer styles, and textures and blending modes, you can unleash your creativity and bring your artistic vision to life. With patience, practice, and attention to detail, you can create captivating images that captivate viewers and evoke emotion with the beauty of the burnt edge effect.


