Unveiling Clarity: A Comprehensive Guide to Sharpening Images with High Pass in Photoshop
Introduction:
In the realm of digital photography, achieving crisp and sharp images is paramount for creating visually striking and professional-looking results. Photoshop, a versatile image editing tool, offers a plethora of techniques to enhance sharpness, and one of the powerful methods is sharpening with the High Pass filter. In this comprehensive guide, we will delve into the art of sharpening images using High Pass in Photoshop—a technique that provides photographers with precision, control, and the ability to accentuate fine details for visually captivating results.
Understanding the Importance of Image Sharpening:
Image sharpening is a crucial step in the post-processing workflow, enhancing the clarity and detail in photographs. Whether capturing portraits, landscapes, or intricate textures, the sharpening process allows photographers to bring out the finer elements of their images, contributing to an overall polished and professional appearance. Photoshop’s High Pass filter technique stands out as an effective and nuanced approach to sharpening, offering flexibility and control in accentuating desired details.
The Power of High Pass Sharpening in Photoshop:
The High Pass filter in Photoshop is a sophisticated tool that allows photographers to selectively enhance the edges and details within an image. Unlike traditional sharpening methods that apply a uniform sharpening effect to the entire image, High Pass sharpening enables precise control over where the sharpening is applied. This technique is particularly valuable for images with distinct edges and intricate details, ensuring that the sharpening adjustments are targeted and tailored to specific areas.
Essential Tools for High Pass Sharpening:
- High Pass Filter:
- The High Pass filter is the key tool for this sharpening technique in Photoshop.
- Located under the “Filter” menu, the High Pass filter allows photographers to isolate and enhance details by adjusting the filter radius.
- Blend Modes:
- Blend modes play a crucial role in integrating the High Pass filter effect into the original image.
- Commonly used blend modes for High Pass sharpening include Overlay, Soft Light, and Hard Light.
- Layer Masks:
- Layer masks are instrumental in controlling the areas where the High Pass sharpening effect is applied.
- By using layer masks, photographers can selectively reveal or conceal the sharpening adjustments for a nuanced and targeted outcome.
- Opacity and Fill Sliders:
- Adjusting the opacity and fill sliders allows for fine-tuning the intensity of the High Pass sharpening effect.
- Photographers can experiment with these sliders to achieve the desired balance between sharpness and subtlety.
Step-by-Step Guide to High Pass Sharpening:
- Open the Image in Photoshop:
- Begin by opening the image that requires sharpening in Photoshop.
- Duplicate the Background Layer:
- Duplicate the background layer by right-clicking on it and selecting “Duplicate Layer.”
- Alternatively, use the keyboard shortcut Ctrl+J (Windows) or Command+J (Mac).
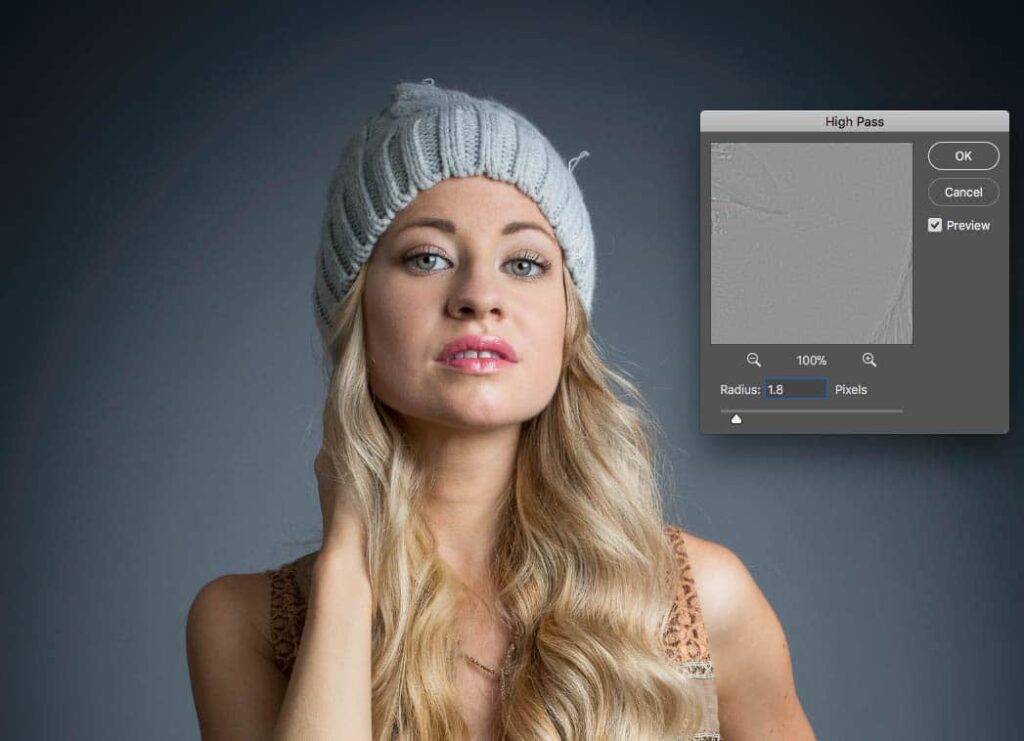
- Apply the High Pass Filter:
- With the duplicated layer selected, go to the “Filter” menu, choose “Other,” and then select “High Pass.”
- Adjust the radius in the High Pass filter dialog box to control the amount of sharpening.
- A lower radius (e.g., 1-3 pixels) enhances fine details, while a higher radius (e.g., 10 pixels) targets broader edges.
- Change Blend Mode to Overlay:
- Change the blend mode of the High Pass layer to Overlay for a standard sharpening effect.
- Experiment with other blend modes like Soft Light or Hard Light for different levels of intensity and contrast.
- Adjust Opacity and Fill:
- Fine-tune the sharpening effect by adjusting the opacity and fill sliders of the High Pass layer.
- Lowering the opacity reduces the overall intensity, while adjusting the fill slider maintains the effect’s opacity but affects layer styles differently.
- Add a Layer Mask:
- Add a layer mask to the High Pass layer by clicking the “Add Layer Mask” icon at the bottom of the Layers panel.
- Use a soft brush to paint with black on the layer mask to selectively hide the sharpening effect in areas where it’s not needed.
- Evaluate Before-and-After:
- Toggle the visibility of the High Pass layer to assess the before-and-after results.
- Make further adjustments as needed to achieve the desired level of sharpening without sacrificing image quality.
Advanced Techniques for Precision and Finesse:
- Selective Sharpening with Multiple High Pass Layers:
- For images with varying levels of detail, consider creating multiple High Pass layers with different radius settings.
- Use layer masks to selectively apply each High Pass layer to specific areas, allowing for tailored sharpening adjustments.
- Smart Objects for Non-Destructive Editing:
- Convert the background layer or duplicated layer into a Smart Object before applying the High Pass filter.
- This enables non-destructive editing, allowing photographers to revisit and fine-tune the High Pass settings at any point in the workflow.
- Additional Sharpening with Unsharp Mask:
- Combine High Pass sharpening with the Unsharp Mask filter for additional control over sharpening.
- Apply the Unsharp Mask filter selectively to specific areas where fine details need emphasis.
- Gradient Masks for Gradual Sharpening:
- Use gradient masks in combination with layer masks to apply sharpening gradually across the image.
- This technique is effective for achieving a natural and subtle sharpening transition, especially in portraits.
- Custom Actions for Efficient Workflow:
- Record custom actions in Photoshop to automate the High Pass sharpening process.
- Create actions that include specific High Pass settings, blend modes, and layer mask adjustments for a consistent and efficient workflow.
Workflow Integration and Efficiency:
- Presets for High Pass Settings:
- Save High Pass filter settings as presets for different types of images.
- This allows for quick application of preferred sharpening configurations across multiple photographs.
- Batch Processing:
- Utilize batch processing in Photoshop to apply High Pass sharpening to a series of images simultaneously.
- This streamlines the workflow when dealing with a large volume of photos.
- Collaborative Editing:
- Collaborate with clients or colleagues during the sharpening process to align the final results with their preferences.
- Collect feedback and make adjustments collaboratively to ensure client satisfaction.
Conclusion:
Sharpening images with High Pass in Photoshop is a nuanced and effective technique that empowers photographers to enhance fine details and achieve visually striking results. By understanding the essential tools, following a step-by-step sharpening guide, and incorporating advanced techniques for precision and finesse, photographers can master the art of High Pass sharpening.
As photographers embark on the journey of image sharpening, the High Pass filter in Photoshop stands as a versatile ally, offering control and flexibility in accentuating details. By integrating these techniques into their workflow, photographers can confidently elevate the sharpness of their images, ensuring that every detail is crisp, clear, and visually impactful.


