Enhancing Portraiture: A Comprehensive Guide to Dilating Pupils in Photoshop for Striking Results
Introduction:
The eyes are often considered the windows to the soul, and in portraiture, capturing the essence of a subject’s gaze is paramount. One effective technique to enhance the intensity and allure of a portrait is to dilate the pupils in post-processing. Dilated pupils not only draw attention to the eyes but also convey a sense of engagement and emotion. In this comprehensive guide, we will delve into the art of dilating pupils using Adobe Photoshop, offering step-by-step instructions and insights for photographers and digital artists seeking to elevate their portraiture.
Chapter 1: Understanding the Impact of Pupil Dilation in Portraits
Pupil dilation is a natural physiological response to various factors, including changes in lighting conditions and emotional states. In portraiture, dilated pupils can create a more captivating and expressive look, conveying a sense of intensity, curiosity, or emotion. Understanding the psychological impact of pupil dilation is crucial for photographers aiming to enhance the visual storytelling aspect of their portraits.
Chapter 2: Capturing the Right Photograph for Pupil Dilation
The foundation for successful pupil dilation in Photoshop starts with capturing a well-exposed and focused photograph. Ensure that your subject is properly lit, and the eyes are sharp and in focus. Natural light or soft artificial light sources often yield the best results, allowing for the nuances of pupil size to be captured effectively.
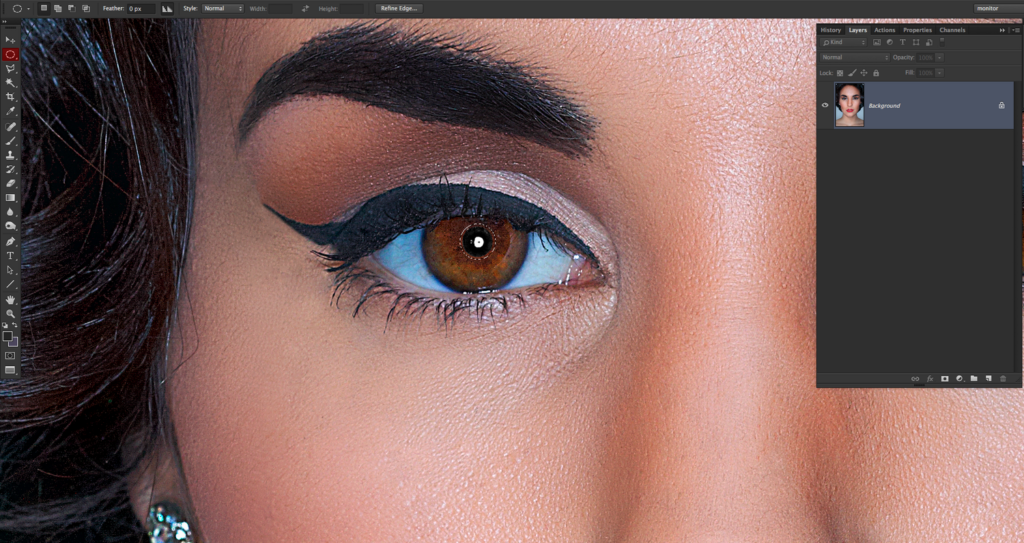
Chapter 3: Importing and Preparing the Image in Photoshop
Begin by opening your portrait in Adobe Photoshop. Duplicate the background layer to create a non-destructive editing environment. This step ensures that your original image remains intact, providing the flexibility to fine-tune adjustments as needed.
Chapter 4: Zooming In for Precision
Zoom in on the eyes of your subject to ensure precision when applying the dilation effect. This step allows you to focus specifically on the pupils without affecting other areas of the image.
Chapter 5: Utilizing the Lasso Tool for Pupil Selection
Select the Lasso Tool (L) from the toolbar and carefully draw around the pupils of your subject. Take your time to create accurate selections, ensuring that only the pupils are included in the selection area.
Chapter 6: Applying the Iris Blur Filter
With the pupils selected, navigate to the “Filter” menu, choose “Blur,” and then select “Iris Blur.” The Iris Blur filter in Photoshop allows you to simulate the effect of a shallow depth of field, emphasizing the pupils while maintaining a natural appearance in the surrounding areas.
Chapter 7: Adjusting the Blur Radius and Shape
Fine-tune the blur effect by adjusting the Radius and Shape sliders within the Iris Blur filter settings. Experiment with different values to achieve a subtle and realistic dilation effect. Be cautious not to overdo the blur, as subtlety is key for a natural and convincing result.
Chapter 8: Refining the Transition Areas
To ensure a seamless integration of the dilation effect, use the Transition slider within the Iris Blur filter settings. This slider controls the smoothness of the transition between the blurred and sharp areas. Adjust the Transition slider to create a gradual and natural shift from the pupils to the surrounding eye area.
Chapter 9: Applying Additional Adjustments for Realism
To enhance the realism of the dilation effect, consider applying additional adjustments. Use the “Curves” adjustment layer to fine-tune the overall contrast and brightness of the eyes. Adjusting the shadows and highlights ensures that the dilated pupils blend seamlessly with the surrounding eye features.
Chapter 10: Fine-Tuning with Layer Masks
Create a layer mask for the Iris Blur adjustment layer to selectively control where the dilation effect is applied. Use a soft brush to paint on the layer mask, revealing or concealing the effect in specific areas. This step allows for precise customization and refinement of the pupil dilation.
Chapter 11: Evaluating the Final Result
Zoom out and evaluate the final result of the pupil dilation effect. Ensure that the eyes appear natural and expressive, with the dilated pupils enhancing the overall impact of the portrait. Compare the edited image with the original to gauge the subtlety and effectiveness of the adjustment.
Conclusion:
Dilating pupils in Photoshop is a powerful technique for enhancing the expressiveness and allure of portraits. By understanding the psychological impact of pupil dilation and following a systematic approach in Photoshop, photographers and digital artists can achieve striking results that draw viewers into the captivating gaze of their subjects. As you integrate pupil dilation into your portraiture toolkit, remember that subtlety and attention to detail are essential for creating natural and convincing effects. Experiment with different images, lighting conditions, and adjustment settings to unlock the full potential of pupil dilation in elevating your portrait photography to new heights.


