Navigating System Updates: A Comprehensive Guide to Managing Windows Automatic Updates in Windows XP
In the dynamic landscape of computing, staying up-to-date with the latest software patches, security fixes, and feature enhancements is essential for maintaining system security, stability, and performance. Windows XP, despite being an older operating system, offers users the convenience of automatic updates, ensuring that their systems receive timely updates and patches from Microsoft. However, there are instances where users may wish to enable or disable the Windows Automatic Update service based on their preferences or specific requirements. In this extensive guide, we’ll delve deep into the intricacies of managing the Windows Automatic Update service in Windows XP, providing users with the knowledge and techniques to customize their update experience with precision and confidence.
Understanding Windows Automatic Updates in Windows XP:
Before we explore the methods for enabling or disabling the Windows Automatic Update service, it’s essential to understand the significance of this feature within the Windows XP operating system. Windows Automatic Updates is a built-in service that allows Windows XP to download and install critical updates, security patches, and service packs automatically from the Microsoft Update website. By enabling automatic updates, users can ensure that their systems remain protected against emerging security threats and vulnerabilities, without the need for manual intervention. However, users may opt to disable automatic updates for various reasons, such as limited internet bandwidth, privacy concerns, or the desire to control the update process manually.
Step-by-Step Guide to Enabling Windows Automatic Update Service:
Now, let’s embark on a systematic journey to enable the Windows Automatic Update service in Windows XP:
Step 1: Accessing the Automatic Updates Settings:
- Click on the “Start” button located at the bottom-left corner of the screen.
- Navigate to “Control Panel” and double-click to open it.
- In the Control Panel window, locate and open the “Security Center” or “Automatic Updates” icon.
Step 2: Configuring Automatic Updates Settings:
- In the Security Center or Automatic Updates window, locate the “Automatic Updates” section.
- Click on the “Automatic (recommended)” option to enable automatic updates.
- Optionally, you can choose the “Download updates for me, but let me choose when to install them” option to have updates downloaded automatically but installed manually.
- Click on the “Apply” or “OK” button to save the changes.
Step 3: Verifying Automatic Updates Configuration:
- After configuring automatic updates settings, Windows XP will periodically check for new updates and install them automatically in the background.
- You can verify the status of automatic updates by checking the “Automatic Updates” section in the Security Center or Automatic Updates window.
Step-by-Step Guide to Disabling Windows Automatic Update Service:
If you wish to disable the Windows Automatic Update service, follow these steps:
Step 1: Accessing the Services Console:
- Click on the “Start” button located at the bottom-left corner of the screen.
- Navigate to “Control Panel” and double-click to open it.
- In the Control Panel window, locate and open the “Administrative Tools” icon.
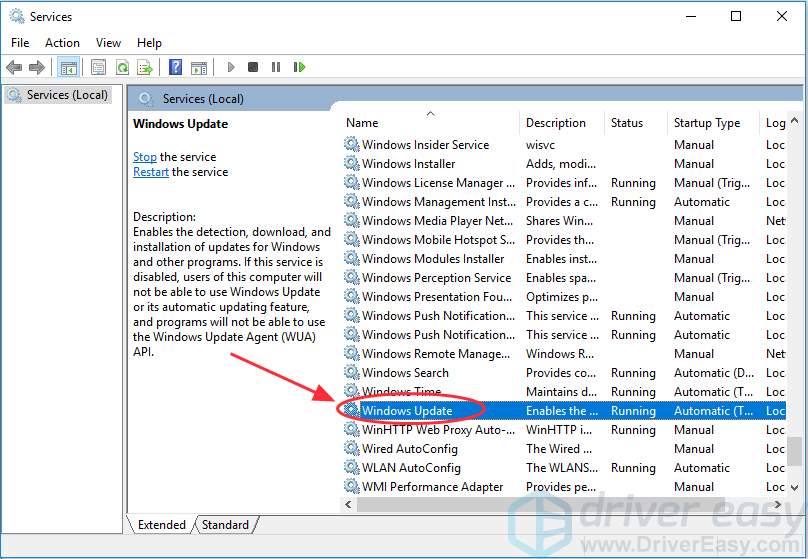
- Within the Administrative Tools window, double-click on the “Services” icon to open the Services console.
Step 2: Disabling the Automatic Updates Service:
- In the Services console, locate and double-click on the “Automatic Updates” service to open its properties.
- In the Automatic Updates Properties window, click on the “Stop” button to stop the service if it is currently running.
- In the “Startup type” dropdown menu, select “Disabled” to prevent the service from starting automatically.
- Click on the “Apply” and “OK” buttons to save the changes and close the Properties window.
Step 3: Verifying Automatic Updates Service Status:
- After disabling the Automatic Updates service, Windows XP will no longer check for or install updates automatically.
- You can verify the status of the Automatic Updates service by checking its entry in the Services console.
Advanced Techniques and Tips:
For advanced users or those seeking additional customization options, consider the following techniques and tips:
- Manual Update Installation: Even with automatic updates disabled, users can still manually check for and install updates from the Microsoft Update website or using the Windows Update application.
- Group Policy Configuration: System administrators can use Group Policy settings to manage automatic updates across multiple computers in a networked environment, providing centralized control and customization options.
- Third-Party Update Management Tools: Explore third-party update management tools and utilities that offer advanced features for managing and controlling updates on Windows XP systems, providing additional flexibility and control over the update process.
Conclusion:
In conclusion, managing the Windows Automatic Update service in Windows XP is a fundamental aspect of system maintenance and security. By following the step-by-step guides outlined in this article and considering advanced techniques and tips, users can customize their update experience according to their preferences and requirements with precision and confidence. Whether enabling automatic updates to ensure timely installation of critical patches and security fixes or disabling automatic updates to maintain control over the update process, mastering the management of the Windows Automatic Update service empowers users to optimize their system’s security, stability, and performance. So take control of your update experience today, enable or disable automatic updates as needed, and ensure that your Windows XP system remains protected and up-to-date in the ever-evolving landscape of computing.


