Navigating Network Drives: A Comprehensive Guide to Mapping Network Drives in Windows XP
In today’s interconnected world, accessing shared files and resources across a network is an essential aspect of productivity and collaboration in both home and business environments. Windows XP, despite being an older operating system, provides users with robust tools for mapping network drives, enabling seamless access to shared folders and files located on remote servers or other computers within the same network. By mapping network drives, users can simplify file management, streamline workflows, and enhance productivity by accessing shared resources as easily as local drives. In this extensive guide, we’ll delve deep into the intricacies of mapping network drives in Windows XP, providing users with the knowledge and techniques to navigate network resources with precision and confidence.
Understanding Network Drives in Windows XP:
Before we explore the methods for mapping network drives, it’s essential to understand the significance of network drives within the Windows XP operating system. Network drives, also known as mapped drives, are virtual drive mappings that point to shared folders or directories located on remote servers or network-attached storage devices. By mapping network drives, users can access shared files and resources across the network as if they were stored locally on their computer. This facilitates collaboration, file sharing, and remote access to network resources, making it easier for users to work with files and folders stored on servers or other computers within the network.
Step-by-Step Guide to Mapping Network Drives:
Now, let’s embark on a systematic journey to map network drives in Windows XP:
Step 1: Accessing the Map Network Drive Wizard:
- Click on the “Start” button located at the bottom-left corner of the screen.
- Navigate to “My Computer” or “Computer” and double-click to open it.
- From the menu options at the top of the window, select “Tools” and then choose “Map Network Drive” from the dropdown menu.
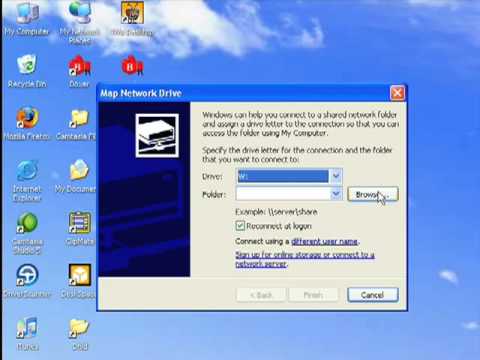
Step 2: Mapping a Network Drive:
- In the Map Network Drive Wizard window, select an available drive letter from the dropdown menu.
- In the “Folder” field, enter the network path to the shared folder or directory you want to map.
- You can enter the network path manually (e.g., \server\share) or click on the “Browse” button to locate the shared folder using the Network Browse feature.
- Optionally, you can check the box next to “Reconnect at logon” to automatically reconnect to the network drive each time you log on to Windows.
- Click on the “Finish” button to complete the mapping process.
Step 3: Accessing Mapped Network Drives:
- Once the network drive is mapped successfully, you can access it from Windows Explorer or My Computer.
- Open Windows Explorer or My Computer and locate the mapped network drive under the “Network Drives” or “Network Locations” section.
- Double-click on the mapped drive to access the shared folder or directory and view its contents.
Step 4: Disconnecting from Mapped Network Drives:
- To disconnect from a mapped network drive, right-click on the drive icon in Windows Explorer or My Computer.
- Select “Disconnect” or “Disconnect Network Drive” from the context menu.
- Confirm the disconnection by clicking on the “Yes” or “OK” button in the confirmation dialog box.
Advanced Techniques and Tips:
For advanced users or those seeking additional customization options, consider the following techniques and tips:
- Using Command-Line Tools: Explore command-line tools such as “net use” to map network drives and manage network connections from the command prompt.
- Persistent Mappings: When mapping network drives, consider using persistent mappings to ensure that drive mappings are retained across system reboots and logon sessions.
- Drive Mapping Scripts: Create batch scripts or login scripts to automate the process of mapping network drives for multiple users or computers within a network environment.
Conclusion:
In conclusion, mapping network drives in Windows XP is a fundamental aspect of accessing shared resources and collaborating effectively across a networked environment. By following the step-by-step guide outlined in this article and considering advanced techniques and tips, users can easily map network drives and navigate network resources with precision and confidence on their Windows XP systems. Whether accessing shared files and folders stored on remote servers or network-attached storage devices, mastering the mapping of network drives empowers users to streamline workflows, enhance productivity, and facilitate seamless collaboration in both home and business settings. So dive into network drive mapping today, explore its capabilities, and unlock a world of possibilities for accessing shared resources across your Windows XP network with ease and efficiency.


