Establishing Seamless Connectivity: A Comprehensive Guide to Setting Up a Wireless Ad-Hoc Network in Windows XP
James April 8, 2024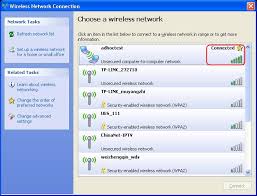
In the modern era of digital connectivity, the ability to create ad-hoc wireless networks provides users with unparalleled flexibility and convenience in sharing resources, collaborating, and accessing the internet. Windows XP, despite being an older operating system, offers robust tools for setting up ad-hoc wireless networks, allowing users to create temporary networks on-the-go without the need for a dedicated wireless access point or router. Whether for sharing files between devices, enabling multiplayer gaming sessions, or connecting devices in environments without existing network infrastructure, mastering the setup of ad-hoc wireless networks empowers users to stay connected and productive wherever they go. In this extensive guide, we’ll delve deep into the intricacies of setting up a wireless ad-hoc network in Windows XP, providing users with the knowledge and techniques to establish seamless connectivity with precision and confidence.
Understanding Ad-Hoc Wireless Networks in Windows XP:
Before we explore the methods for setting up a wireless ad-hoc network, it’s essential to understand the significance of ad-hoc networks within the Windows XP operating system. Ad-hoc wireless networks, also known as peer-to-peer networks, allow devices equipped with wireless network adapters to connect directly with each other without the need for a centralized access point or router. This enables users to create temporary networks on-the-fly, facilitating communication, file sharing, and internet access in scenarios where traditional network infrastructure may be unavailable or impractical. By setting up ad-hoc wireless networks, users can harness the power of wireless connectivity to collaborate, share resources, and stay connected in diverse environments.
Step-by-Step Guide to Setting Up a Wireless Ad-Hoc Network:
Now, let’s embark on a systematic journey to set up a wireless ad-hoc network in Windows XP:
Step 1: Accessing Wireless Network Connections:
- Click on the “Start” button located at the bottom-left corner of the screen.
- Navigate to “Control Panel” and double-click to open it.
- In the Control Panel window, locate and open the “Network Connections” icon.
Step 2: Creating a New Ad-Hoc Network:
- In the Network Connections window, right-click on the wireless network adapter icon and select “Properties” from the context menu.
- In the Properties window, navigate to the “Wireless Networks” tab.
- Click on the “Add” button to create a new wireless network profile.
Step 3: Configuring Ad-Hoc Network Settings:
- In the Wireless Network Properties window, enter a name for your ad-hoc network in the “Network name (SSID)” field.
- Optionally, you can enable encryption and specify a network key (password) to secure your ad-hoc network.
- Ensure that the “This is a computer-to-computer (ad-hoc) network” option is selected.
- Click on the “OK” or “Apply” button to save the network settings.
Step 4: Connecting to the Ad-Hoc Network:
- After creating the ad-hoc network profile, close the Properties window.
- Right-click on the wireless network adapter icon in the Network Connections window and select “View Available Wireless Networks” from the context menu.
- Locate the ad-hoc network you created in the list of available networks and click on it to connect.
- If prompted, enter the network key (password) you specified during the network setup process.
- Once connected, you can begin sharing files, resources, and internet access with other devices on the ad-hoc network.
Step 5: Disconnecting from the Ad-Hoc Network:
- To disconnect from the ad-hoc network, simply right-click on the wireless network adapter icon in the Network Connections window.
- Select “Disconnect” from the context menu to terminate the connection to the ad-hoc network.
Advanced Techniques and Tips:
For advanced users or those seeking additional customization options, consider the following techniques and tips:
- Optimizing Network Performance: Adjust wireless network adapter settings and antenna positioning to optimize signal strength and minimize interference for improved network performance.
- Sharing Internet Connection: Configure Internet Connection Sharing (ICS) to share your computer’s internet connection with other devices on the ad-hoc network, enabling internet access for all connected devices.
- Using Third-Party Software: Explore third-party software tools and utilities that offer advanced features for managing ad-hoc networks, including network monitoring, troubleshooting, and performance optimization.
Conclusion:
In conclusion, setting up a wireless ad-hoc network in Windows XP is a versatile and convenient solution for establishing temporary wireless connectivity in various scenarios. By following the step-by-step guide outlined in this article and considering advanced techniques and tips, users can create ad-hoc networks with precision and confidence, enabling seamless communication, resource sharing, and internet access on-the-go. Whether collaborating on projects, sharing files between devices, or connecting devices in environments without existing network infrastructure, mastering the setup of ad-hoc wireless networks empowers users to stay connected and productive wherever they go. So dive into ad-hoc network setup today, explore its capabilities, and unlock a world of possibilities for wireless connectivity on your Windows XP system with ease and efficiency.


