Unlocking Creativity: A Comprehensive Guide to Utilizing Windows Photo Viewer in Windows 7
In the digital age, photographs serve as windows to our memories, enabling us to relive cherished moments and share experiences with others. Windows 7 introduces a versatile tool known as Windows Photo Viewer, designed to provide users with a seamless and intuitive platform for viewing, organizing, and editing their digital photo collections. Whether you’re a photography enthusiast, a professional artist, or simply someone who enjoys capturing moments, understanding how to harness the full potential of Windows Photo Viewer is essential for unlocking creativity and enhancing your visual experience. In this comprehensive guide, we will delve deep into the intricacies of using Windows Photo Viewer in Windows 7, providing step-by-step instructions, advanced techniques, and practical insights to help you make the most of your digital photo library.
Understanding Windows Photo Viewer in Windows 7:
Before delving into the process of using Windows Photo Viewer, let’s first grasp the concept and significance of this versatile tool:
- Viewing and Organizing Photos: Windows Photo Viewer serves as a centralized platform for viewing and organizing digital photos stored on your computer.
- Intuitive User Interface: With its simple and intuitive user interface, Windows Photo Viewer allows users to navigate through their photo collections effortlessly.
- Basic Editing Features: While primarily focused on viewing photos, Windows Photo Viewer also offers basic editing features for cropping, rotating, and adjusting photo orientation.
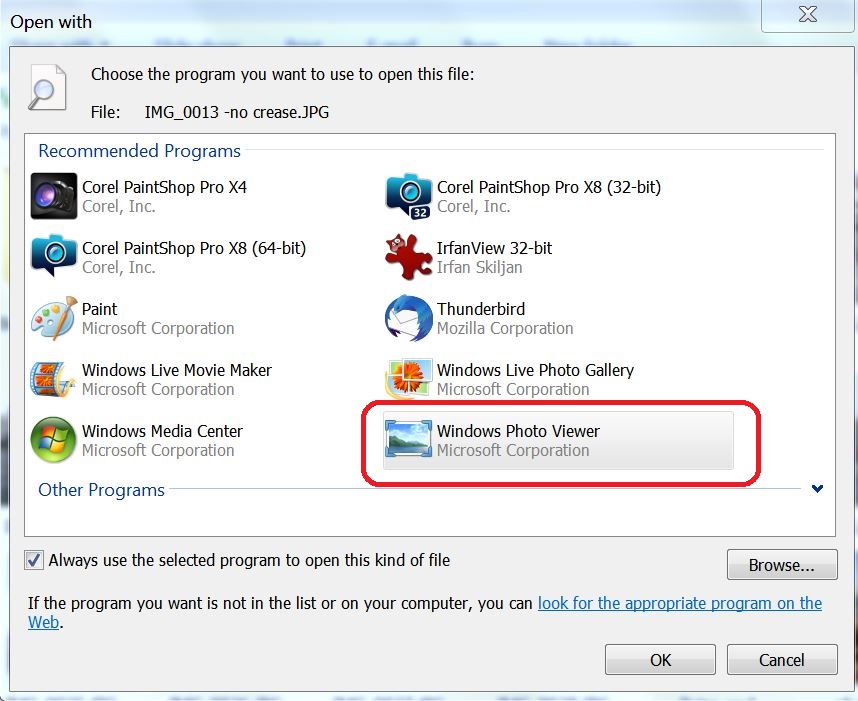
Accessing Windows Photo Viewer in Windows 7:
Now, let’s explore how to access and navigate Windows Photo Viewer in Windows 7:
- Accessing Windows Photo Viewer:
- Locate a photo file (e.g., JPEG, PNG) on your computer.
- Right-click on the photo file and select “Open with” from the context menu.
- Choose “Windows Photo Viewer” from the list of available programs to open the photo in Windows Photo Viewer.
- Navigating Windows Photo Viewer:
- Once opened, Windows Photo Viewer displays the selected photo in a full-screen view.
- Use the arrow keys or mouse scroll wheel to navigate between photos in the same folder.
- Utilize the toolbar at the bottom of the window to access additional features and options.
Using Windows Photo Viewer Features:
Now that we’ve accessed Windows Photo Viewer, let’s explore its key features and functionalities:
- Viewing Photos:
- Windows Photo Viewer allows users to view photos in various formats, including JPEG, PNG, BMP, and GIF.
- Zoom in and out of photos using the zoom slider or mouse scroll wheel.
- Rotate photos clockwise or counterclockwise for optimal viewing.
- Slideshow Mode:
- Initiate a slideshow by clicking on the “Slideshow” button in the toolbar.
- Customize slideshow settings such as slideshow speed, transition effects, and background music.
- Basic Editing:
- Click on the “Edit, Organize, or Share” button in the toolbar to access basic editing features.
- Crop photos to remove unwanted elements or adjust composition.
- Rotate photos to correct orientation or align them properly.
- Sharing Photos:
- Share photos directly from Windows Photo Viewer by clicking on the “Email” button in the toolbar.
- Select the desired email application and follow the prompts to compose and send an email with the selected photo attached.
Advanced Features and Tips:
To further enhance your experience with Windows Photo Viewer in Windows 7, consider the following advanced features and tips:
- Integration with Windows Live Photo Gallery:
- Windows Photo Viewer integrates seamlessly with Windows Live Photo Gallery, a comprehensive photo management and editing tool.
- Use Windows Live Photo Gallery to organize, edit, and share your photos with friends and family.
- Customizing Slideshow Settings:
- Customize slideshow settings such as transition effects, slideshow speed, and background music to create a personalized viewing experience.
- Experiment with different settings to enhance the visual impact of your photo slideshows.
- Batch Editing with Windows Live Photo Gallery:
- For advanced editing tasks such as batch resizing, retouching, and color correction, consider using Windows Live Photo Gallery.
- Take advantage of batch editing features to streamline your photo editing workflow and save time.
- Exploring Additional Viewing Options:
- Windows Photo Viewer offers additional viewing options such as full-screen mode, thumbnail view, and slideshow mode.
- Explore these options to find the viewing mode that best suits your preferences and workflow.
Conclusion:
Windows Photo Viewer in Windows 7 serves as a versatile and user-friendly platform for viewing, organizing, and editing digital photos. By following the comprehensive guide outlined above, users can effectively utilize Windows Photo Viewer to navigate through their photo collections, initiate slideshows, and perform basic editing tasks with ease. Whether you’re a photography enthusiast, a professional artist, or simply someone who enjoys capturing moments, Windows Photo Viewer provides you with the tools and flexibility to enhance your visual experience and unlock your creativity. So embrace the power of Windows Photo Viewer today, master its features and functionalities with confidence, and embark on a journey of exploration and discovery through your digital photo library.


