Mastering Mail Merge in MS Word: A Comprehensive Guide to Creating Personalized Documents
Introduction: Mail merge is a powerful feature in Microsoft Word that allows you to create personalized documents, such as letters, envelopes, labels, or email messages, by merging a template document with a data source, such as an Excel spreadsheet or a contact list. Whether you’re sending out personalized letters to your clients, creating custom invitations for an event, or generating mailing labels for a mass mailing, mastering mail merge in MS Word can save you time and effort while ensuring accuracy and consistency in your communications. In this comprehensive guide, we will explore the step-by-step process of creating a mail merge in MS Word, from preparing your data source to merging it with a document template and completing the merge.
Understanding Mail Merge: Mail merge is a process that involves combining a template document, known as the main document, with a data source, such as a spreadsheet or a database, to generate personalized documents for multiple recipients. The main document contains placeholders, called merge fields, which are replaced with data from the data source during the merge process. This allows you to create customized documents that address each recipient individually, without having to manually enter their information.
Key Components of Mail Merge: Before diving into the mail merge process, it’s essential to understand the key components involved:
- Main Document: The main document serves as the template for your merged documents. It contains the layout, formatting, and content that will remain consistent across all merged documents. Merge fields are inserted into the main document to indicate where data from the data source should be inserted.
- Data Source: The data source is a file or database that contains the information you want to merge into your documents. This can be an Excel spreadsheet, a CSV file, an Access database, or an Outlook contact list. The data source should be organized in a tabular format, with each row representing a record and each column representing a field (e.g., name, address, email).
- Merge Fields: Merge fields are placeholders inserted into the main document to indicate where data from the data source should be inserted. Merge fields are enclosed in double curly braces, such as {{First Name}}, {{Last Name}}, or {{Address}}. During the merge process, these merge fields are replaced with the corresponding data from the data source.
Steps to Create a Mail Merge in MS Word: Now that we’ve covered the basics, let’s walk through the step-by-step process of creating a mail merge in MS Word:
Step 1: Prepare Your Data Source
- Open Microsoft Excel or your preferred data source application.
- Organize your data into columns, with each column representing a field (e.g., First Name, Last Name, Address, City, State, Zip Code).
- Save your data source file in a compatible format (e.g., Excel workbook, CSV file).
Step 2: Open a New Document in MS Word
- Open Microsoft Word and create a new blank document.
- Go to the “Mailings” tab on the Ribbon.
Step 3: Select Document Type
- In the “Start Mail Merge” group, click on “Start Mail Merge” and select the type of document you want to create (e.g., Letters, Envelopes, Labels).
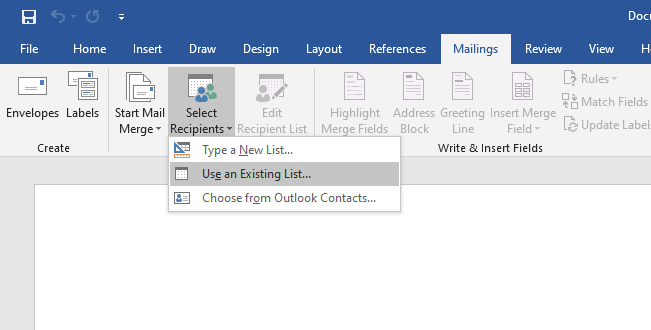
Step 4: Select Recipients
- In the “Start Mail Merge” group, click on “Select Recipients” and choose the option that corresponds to your data source (e.g., “Use an Existing List” for an Excel spreadsheet).
- Navigate to and select your data source file.
- Choose the specific worksheet or table within the data source file that contains your data.
Step 5: Insert Merge Fields
- Place your cursor in the main document where you want to insert a merge field.
- In the “Write & Insert Fields” group, click on “Insert Merge Field.”
- Select the merge field you want to insert from the dropdown menu.
- Repeat this process to insert merge fields for each piece of information you want to include in your merged document (e.g., First Name, Last Name, Address).
Step 6: Preview Your Merge
- In the “Preview Results” group, click on “Preview Results” to preview how your merged document will appear with actual data from your data source.
- Use the navigation buttons to scroll through the merged documents and verify that the information is displayed correctly.
Step 7: Complete the Merge
- Once you’re satisfied with the preview, click on “Finish & Merge” in the “Finish” group.
- Choose the desired option from the dropdown menu (e.g., “Edit Individual Documents” to merge all records into a single document or “Print Documents” to print the merged documents).
- Follow the prompts to complete the merge process and generate your personalized documents.
Advanced Mail Merge Techniques: In addition to the basic mail merge process outlined above, MS Word offers several advanced techniques and features to customize and enhance your mail merge documents. Here are some advanced techniques you can explore:
- Conditional Formatting: Use IF fields to create conditional statements that customize the content of your merged documents based on specific criteria (e.g., If Total Sales > $1000, display “VIP Customer”).
- Sorting and Filtering: Sort and filter your data source to include or exclude specific records from the merge based on criteria such as date range, geographic location, or customer category.
- Inserting Graphics: Insert images, logos, or other graphics into your main document to add visual interest and branding to your merged documents.
- Using Rules: Create rules to format merge fields dynamically based on specific conditions (e.g., change font color to red for overdue invoices).
- Data Source Integration: Link your data source directly to your main document using data connections or OLE DB queries to automatically update merged documents with the latest data from your data source.
Conclusion: Mastering mail merge in MS Word is a valuable skill that can save you time and effort while allowing you to create personalized documents for a variety of purposes. Whether you’re sending out mass mailings, generating custom reports, or creating personalized invitations, knowing how to create a mail merge can streamline your workflow and improve the effectiveness of your communications. By following the step-by-step process outlined in this guide and exploring advanced techniques and features, you can unlock the full potential of mail merge in MS Word and create professional-looking documents that make a lasting impression. So next time you need to create personalized documents, harness the power of mail merge in MS Word to customize your content, engage your audience, and achieve your communication goals with ease and precision.


