Mastering Masking in Premiere Pro: A Comprehensive Guide on How to Use the Pen Tool for Precision Masking
Introduction: Adobe Premiere Pro is a powerful video editing software that offers a wide range of tools for creative expression and visual storytelling. One of the most versatile tools in Premiere Pro is the Pen Tool, which allows users to create precise masks for selective editing, compositing, and visual effects. In this comprehensive guide, we will explore how to use the Pen Tool for masking in Premiere Pro, from basic techniques to advanced tips and tricks for achieving professional results.
Understanding Masking: Masking is a technique used in video editing to selectively apply effects, adjustments, or transformations to specific areas of a video clip or image. Masks act as virtual stencils that define where an effect or adjustment is visible or hidden, allowing editors to isolate and manipulate elements within a scene. The Pen Tool in Premiere Pro enables users to create custom masks with precision and flexibility, making it an essential tool for various editing tasks, including color correction, object removal, and visual effects compositing.
Step 1: Import Footage and Create a New Sequence The first step in using the Pen Tool for masking in Premiere Pro is to import your footage into the project panel and create a new sequence. Drag and drop your video clip onto the timeline to create a new sequence with the same settings as your footage. Alternatively, you can create a new sequence manually and adjust the settings to match your footage specifications.
Step 2: Select the Pen Tool Once your sequence is set up, select the Pen Tool from the toolbar or press the “P” key on your keyboard to activate it. The Pen Tool allows you to create Bezier curves and straight lines by clicking and dragging on the program monitor.
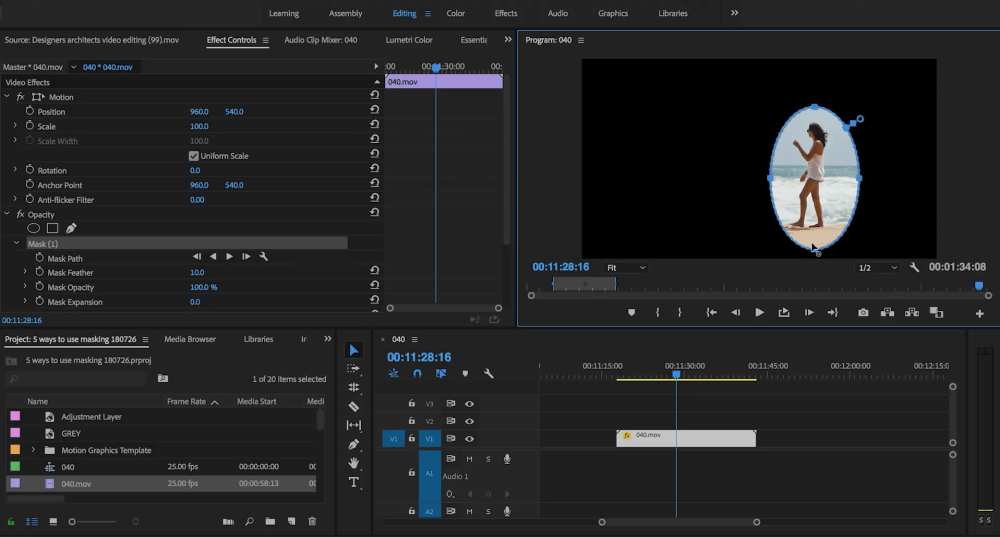
Step 3: Create a Mask To create a mask using the Pen Tool, click on the program monitor to define the starting point of your mask. Click and drag to create a curved line segment, and release the mouse button to anchor the curve. Continue clicking and dragging to create additional curve segments or straight lines, adjusting the shape of the mask as needed. To close the mask, click on the starting point or press the “Ctrl/Cmd” key and click.
Step 4: Adjust Mask Properties Once you’ve created your mask, you can adjust its properties to refine the selection and achieve the desired effect. Select the mask in the Effect Controls panel to reveal its properties, including Mask Path, Mask Feather, Mask Opacity, and Mask Expansion. Use these properties to fine-tune the mask shape, soften edges, adjust transparency, and expand or contract the mask area.
Step 5: Apply Effects or Adjustments With your mask in place, you can now apply effects or adjustments to the masked area. Select the effect or adjustment you want to apply from the Effects panel and drag it onto the clip on the timeline. The effect will automatically be applied only to the masked area, allowing you to create targeted corrections, enhancements, or visual effects.
Step 6: Refine and Animate the Mask To further refine your mask or create dynamic effects, you can animate its properties over time. Use keyframes to animate the Mask Path, Mask Feather, Mask Opacity, or other mask properties to create movement, reveal or hide elements, or track objects within the frame. Use the Playhead to navigate to different frames and adjust the mask properties as needed to create smooth and seamless transitions.
Step 7: Preview and Fine-Tune Once you’ve applied your mask and effects, preview the result in the Program Monitor to ensure that it meets your expectations. Play back the timeline to see how the mask interacts with other elements in the scene and make any necessary adjustments to the mask shape, properties, or effect settings. Continue fine-tuning until you achieve the desired look and feel for your project.
Step 8: Export and Share Once you’re satisfied with the masked footage, it’s time to export your project and share it with your audience. Click on the Export button in the top menu bar to open the Export Settings window. Choose your desired export settings, including format, resolution, and bitrate, and click Export to render the final video file. Share your video on social media, upload it to your website, or distribute it through other channels to showcase your creative work.
Tips and Tricks:
- Use the Zoom tool (shortcut: “Z”) to zoom in and out of the program monitor for more precise mask adjustments.
- Press the spacebar to toggle between the Pen Tool and the Selection Tool (shortcut: “V”) for quick navigation and editing.
- Experiment with different mask shapes, feathering settings, and animation techniques to achieve unique visual effects and creative enhancements.
- Practice using the Pen Tool on simple shapes and objects before tackling more complex masking tasks to build confidence and proficiency.
Conclusion: The Pen Tool is a powerful tool for masking in Adobe Premiere Pro, allowing users to create precise and flexible masks for selective editing, compositing, and visual effects. By following the step-by-step process outlined in this guide and experimenting with different techniques and settings, you can master the art of masking and unleash your creativity in video editing. Whether you’re retouching footage, creating visual effects, or crafting cinematic transitions, the Pen Tool is an essential tool in your editing arsenal for achieving professional results and captivating your audience.


