Mastering Motion Graphics: A Comprehensive Guide to Creating a HUD Interface in Adobe After Effects
Introduction: Heads-Up Display (HUD) interfaces are ubiquitous in science fiction films, video games, and futuristic media, providing users with essential information, data, and graphics overlaid onto a screen. Adobe After Effects offers powerful tools and features for creating dynamic and visually stunning HUD interfaces, allowing designers and animators to craft immersive and futuristic visuals. In this comprehensive guide, we will explore the step-by-step process of creating a HUD interface in Adobe After Effects, from designing the elements to animating the interface for maximum impact.
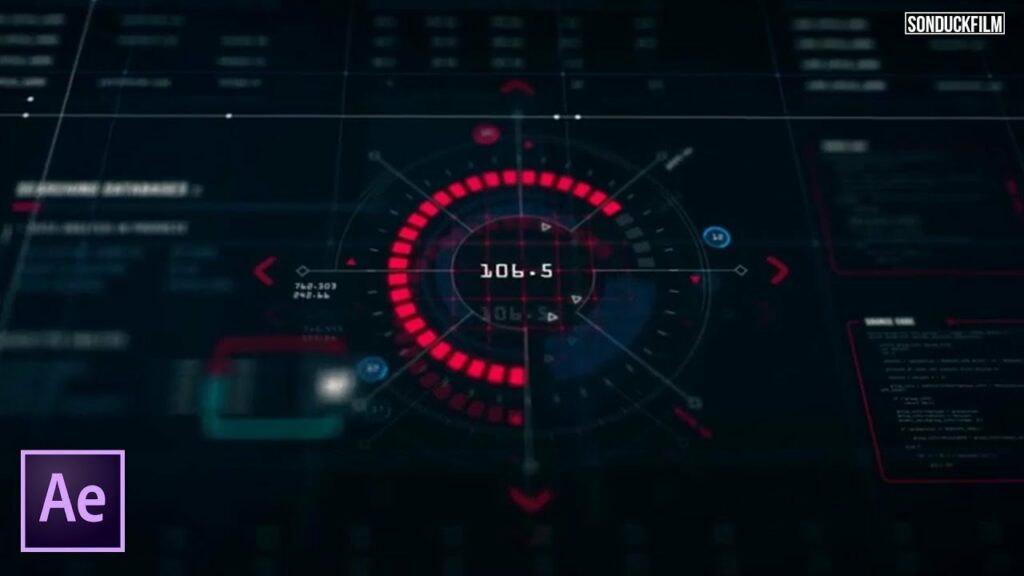
Understanding HUD Interfaces: HUD interfaces are characterized by their sleek, futuristic design, featuring elements such as digital readouts, graphs, charts, grids, and animated graphics. These interfaces convey information in a visually compelling and intuitive manner, enhancing the user experience and adding depth to the narrative. In After Effects, HUD interfaces can be created using a combination of shape layers, text layers, masks, effects, and animations to achieve the desired look and functionality.
Step 1: Planning and Designing the Interface Before diving into After Effects, start by planning and designing the HUD interface layout and elements. Consider the purpose and context of the interface, as well as the information and data it needs to convey. Sketch out the layout and design of the interface, including the placement of elements such as text, graphics, icons, and buttons. Pay attention to hierarchy, organization, and readability to ensure the interface is clear and intuitive for the viewer.
Step 2: Creating Shape Layers and Graphics In After Effects, begin by creating the individual elements of the HUD interface using shape layers, text layers, and graphics. Use the Pen tool, Rectangle tool, Ellipse tool, and other shape tools to draw geometric shapes such as rectangles, circles, and polygons for backgrounds, frames, and buttons. Customize the appearance of the shapes by adjusting properties such as fill color, stroke color, stroke width, and opacity to achieve the desired aesthetic.
Step 3: Adding Text and Typography Incorporate text layers into the HUD interface to display labels, titles, descriptions, and data. Use the Text tool to create text layers and adjust properties such as font, size, weight, color, alignment, and spacing to ensure readability and visual coherence. Experiment with different typography styles and effects to enhance the futuristic and dynamic look of the interface.
Step 4: Applying Effects and Animations To bring the HUD interface to life, apply effects and animations to the elements. Use effects such as Glow, Gradient Ramp, and Bevel Alpha to add depth, dimension, and visual interest to the interface. Experiment with animations such as scale, rotation, position, opacity, and shape morphing to create dynamic transitions and interactions between elements. Utilize keyframes, easing curves, and timing adjustments to achieve smooth and fluid motion effects that captivate the viewer.
Step 5: Incorporating Data Visualization If the HUD interface requires displaying data or information, incorporate data visualization techniques such as graphs, charts, meters, and gauges. Use shape layers, masks, and expressions to create dynamic data-driven animations that respond to changes in input parameters or external data sources. Experiment with color coding, motion graphics, and visual effects to convey information effectively and intuitively to the viewer.
Step 6: Organizing and Layering Elements As you design the HUD interface, pay attention to organization and layering to ensure clarity and efficiency. Use composition layers, precompositions, and adjustment layers to organize and structure the interface elements logically. Group related elements together using null objects or parenting to facilitate animation and control. Label layers and compositions descriptively to streamline workflow and collaboration.
Step 7: Adding Interactive Elements (Optional) For interactive HUD interfaces, consider adding interactive elements such as buttons, sliders, switches, and input fields. Use shape layers, text layers, and expressions to create interactive controls that respond to user input or mouse movements. Incorporate expressions, scripts, or third-party plugins to enable functionality such as data input, parameter adjustment, or user interaction.
Step 8: Testing and Iteration As you design and animate the HUD interface, test it regularly to assess its functionality, usability, and visual appeal. Play through the animation in real-time, making note of any areas that may need further refinement or adjustment. Solicit feedback from colleagues, clients, or test users to gather insights and identify areas for improvement. Iterate on the design based on feedback and testing results to create a polished and effective HUD interface.
Step 9: Rendering and Exporting Once you’re satisfied with the HUD interface design and animation, it’s time to render and export the composition for use in your video projects or interactive applications. In After Effects, select “Composition” > “Add to Render Queue” to add the composition to the render queue. Configure the render settings, such as output format, resolution, and codec options, and click “Render” to export the final animation with the HUD interface applied.
Conclusion: Creating a HUD interface in Adobe After Effects offers a versatile and powerful tool for crafting immersive and futuristic visuals. By mastering the fundamentals of interface design, animation, and visual effects, you can unleash your creativity and bring your creative visions to life. Whether used for enhancing sci-fi films, video games, or interactive installations, HUD interfaces offer endless possibilities for storytelling, data visualization, and user interaction. Experiment with different techniques, styles, and applications to discover your unique artistic voice and create captivating HUD interfaces that captivate and inspire audiences.


