Mastering Precision: A Comprehensive Guide to Using the Masking Tool in DaVinci Resolve
Introduction: Masking is a fundamental technique in video editing that allows editors to selectively apply effects, adjustments, or transformations to specific areas of their footage. DaVinci Resolve, a leading professional video editing software, offers a powerful masking toolset that empowers editors to create intricate masks with precision and accuracy. Whether you’re looking to isolate a subject, apply color grading to a specific area, or create complex visual effects, mastering the masking tool in DaVinci Resolve is essential for achieving professional-quality results. In this comprehensive guide, we’ll explore the intricacies of using the masking tool in DaVinci Resolve, covering techniques, workflows, and expert tips to help you harness the full potential of this versatile tool.
Understanding the Masking Tool in DaVinci Resolve: The masking tool in DaVinci Resolve allows editors to create and manipulate masks to isolate specific areas of their footage for targeted editing or effects application. Masks can be applied to video clips, adjustment layers, or nodes within the node editor, providing flexibility and control over the editing process. DaVinci Resolve offers a variety of masking tools, including rectangular masks, elliptical masks, freehand masks, and bezier masks, each with its own set of parameters and customization options. By mastering these masking tools, editors can achieve precise and nuanced edits that enhance the visual impact of their projects.
Step-by-Step Guide to Using the Masking Tool in DaVinci Resolve:
- Import Footage: Start by launching DaVinci Resolve and creating a new project. Import the footage you want to work with into your project media pool.
- Add Footage to Timeline: Drag the footage from the media pool onto the timeline at the bottom of the DaVinci Resolve interface. This will allow you to work with the footage and apply masks directly within the timeline.
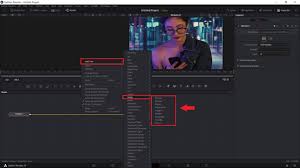
- Access the Masking Tools: To access the masking tools in DaVinci Resolve, navigate to the Color tab at the bottom of the interface. Within the Color tab, locate the Node Editor panel, which provides access to the masking tools and other node-based editing features.
- Create a New Node: Before applying a mask, create a new node for the clip you want to mask. Right-click on the clip in the Node Editor panel and select “Add Node” from the context menu. This will create a new node for the clip, which will serve as the base for applying masks and effects.
- Select Masking Tool: Once you’ve created a new node, select the masking tool you want to use from the toolbar at the top of the Node Editor panel. DaVinci Resolve offers a range of masking tools, including rectangular, elliptical, freehand, and bezier masks.
- Draw the Mask: With the masking tool selected, use your mouse or pen tablet to draw the mask directly onto the viewer window. For rectangular and elliptical masks, click and drag to define the shape and size of the mask. For freehand and bezier masks, click and drag to create anchor points and adjust the shape of the mask.
- Adjust Mask Parameters: After drawing the mask, you can adjust its parameters and properties to fine-tune its appearance and behavior. Use the controls in the Node Editor panel to modify parameters such as feathering, expansion, and opacity to achieve the desired masking effect.
- Track the Mask (Optional): If the area you’re masking moves or changes position within the frame, you can use DaVinci Resolve’s tracking tools to automatically track the mask to the subject. Right-click on the mask in the Node Editor panel and select “Track” from the context menu to initiate the tracking process.
- Apply Effects or Adjustments: Once you’ve created and adjusted the mask, you can apply effects or adjustments to the masked area. This could include color grading, exposure adjustments, blur effects, or any other creative effects you want to apply specifically to the masked area.
- Refine and Iterate: Preview the masked footage in the viewer window to assess the effectiveness of the masking effect. Make any necessary adjustments to the mask parameters, tracking, or effects to refine the effect and achieve the desired result.
- Export Your Footage: Once you’re satisfied with the masked footage, export it out of DaVinci Resolve to create the final video file. Go to File > Export > Deliver and choose the desired export settings, format, and destination for your video. Click Export to render and save the video with the masking effect applied.
Tips and Best Practices for Using the Masking Tool in DaVinci Resolve:
- Plan Your Masks: Before creating a mask, carefully plan out the areas you want to isolate and edit. Consider the composition, movement, and lighting of the footage, and identify the specific areas that would benefit from masking.
- Use Multiple Masks: For complex masking tasks, consider using multiple masks to isolate different areas of the footage. This allows for greater precision and control over the editing process, especially when dealing with overlapping or intersecting elements.
- Refine Feathering and Expansion: Experiment with feathering and expansion settings to achieve seamless blending between the masked and unmasked areas of the footage. Adjusting these parameters can help create smooth transitions and natural-looking effects.
- Track Carefully: When using the tracking feature to track masks to moving subjects, ensure that the tracking points accurately follow the subject’s movement. Manually adjust the tracking points as needed to maintain alignment with the subject throughout the duration of the clip.
- Experiment with Effects: Don’t be afraid to experiment with different effects and adjustments to apply to the masked area. Combine color grading, blur effects, and other creative effects to achieve unique and visually stunning results.
- Save Versions: Before making extensive edits to your masked footage, consider saving multiple versions of your project as you work. This allows you to experiment with different masking techniques and effects without fear of losing your progress.
Conclusion: The masking tool in DaVinci Resolve is a powerful feature that empowers editors to selectively apply effects, adjustments, and transformations to specific areas of their footage with precision and accuracy. By following the steps outlined in this comprehensive guide and incorporating tips and best practices, you’ll be well-equipped to master the art of masking in DaVinci Resolve and create visually stunning compositions that captivate and engage your audience. So, dive in, experiment fearlessly, and let your creativity soar as you harness the full potential of the masking tool in DaVinci Resolve.


