Mastering the Art of Image Resizing in Photoshop: A Comprehensive Guide for Creative Precision
Introduction:
Adobe Photoshop, a powerhouse in the realm of digital imaging, offers an array of tools and features that empower creators to refine and enhance their visual content. One fundamental skill within the Photoshop toolkit is the art of image resizing. Whether you’re a photographer preparing images for different platforms, a designer crafting visuals for a variety of mediums, or an enthusiast seeking to optimize your digital content, mastering the techniques of image resizing in Photoshop is essential. In this extensive guide, we will explore the intricacies of resizing images in Photoshop, covering fundamental concepts, advanced techniques, and best practices for achieving creative precision.
I. Understanding the Basics of Image Resizing:
Before delving into the technical aspects, it’s crucial to grasp the fundamental concepts of image resizing. Resizing involves altering the dimensions of an image, adjusting its width and height. The process can be categorized into two primary types: upscaling (increasing dimensions) and downscaling (decreasing dimensions). Each type has its considerations, impacting image quality and visual appeal.
II. Navigating the Photoshop Interface:
Familiarity with the Photoshop interface is a prerequisite for efficient image resizing. Open Adobe Photoshop and load the image you wish to resize. The toolbar, options bar, layers panel, and various menus are essential components that facilitate a seamless resizing workflow. Understanding the role of each element streamlines the process, enabling you to navigate the software with ease.
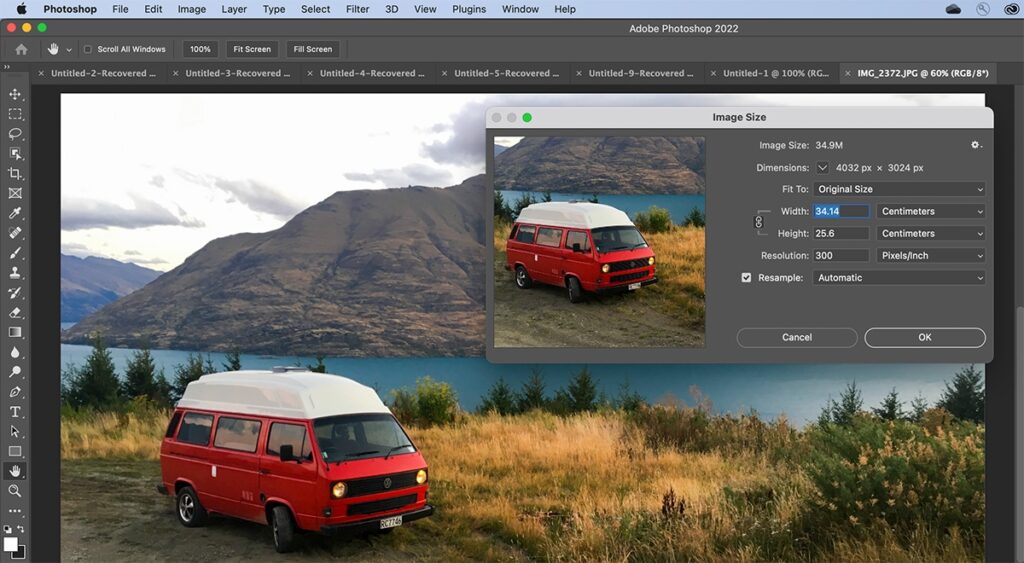
III. Accessing the Image Size Dialog Box:
Adobe Photoshop provides a dedicated Image Size dialog box that serves as the central hub for resizing tasks. To access this feature, navigate to the “Image” menu, select “Image Size,” or use the keyboard shortcut “Alt + Ctrl + I” (Option + Command + I on Mac). The Image Size dialog box offers a comprehensive set of options for adjusting the dimensions of your image.
IV. Resampling and Resolution:
One of the critical considerations when resizing images is the concept of resampling. Resampling involves recalculating pixel values when altering the dimensions of an image. Within the Image Size dialog box, the “Resample” option allows you to choose between various resampling methods, such as Bicubic Smoother, Bicubic Sharper, and Bicubic Automatic. Additionally, the resolution setting impacts the quality and detail of the resized image, especially in print applications.
V. Constrain Proportions: Maintaining Aspect Ratio:
Preserving the aspect ratio of an image ensures that it remains proportionate during resizing, preventing distortion. The “Constrain Proportions” option within the Image Size dialog box automatically adjusts the width or height when you modify one dimension. This feature is vital for maintaining the visual integrity of your images.
VI. Pixel Dimensions and Document Size:
The Image Size dialog box displays essential information about pixel dimensions and document size. Pixel dimensions represent the width and height of the image in pixels, while document size provides information about the print dimensions based on the resolution setting. Understanding these parameters is crucial for achieving precision in resizing for both digital and print applications.
VII. Resizing with the Crop Tool:
In addition to the Image Size dialog box, the Crop Tool in Photoshop offers a dynamic approach to resizing images. By selecting the Crop Tool and adjusting the crop boundaries, you can simultaneously resize and crop the image. This method is particularly useful for refining compositions and achieving specific dimensions.
VIII. Smart Objects for Non-Destructive Resizing:
To maintain flexibility and avoid irreversible changes during resizing, consider converting your image layer into a Smart Object. Right-click on the image layer and select “Convert to Smart Object.” This preserves the original image, allowing you to make adjustments without compromising quality. Double-clicking on the Smart Object opens a separate window for further editing.
IX. Using the Free Transform Tool:
The Free Transform tool provides a versatile way to resize images, offering additional transformation options beyond simple dimension adjustments. Activate the Free Transform tool by pressing “Ctrl + T” (Command + T on Mac). Hold down the Shift key to maintain proportions while dragging the corner handles. Experiment with rotation, skewing, and distortion for creative resizing effects.
X. Batch Resizing for Efficiency:
When dealing with multiple images, Photoshop streamlines the resizing process with the Batch feature. Create an action recording the resizing steps, then apply this action to an entire folder of images. This efficient method saves time and ensures consistency across a series of photographs or design elements.
XI. Practical Tips and Best Practices:
a. Back Up Your Images: Before initiating any resizing operation, create a backup of your original images. This precautionary step safeguards against unintended changes and allows you to revert to the original files if needed.
b. Consider Your Output Medium: Tailor your resizing approach based on the intended output medium. Web images may have different size requirements than images destined for print, each demanding a specific approach to achieve optimal results.
c. Experiment with Different Resampling Methods: Different resampling methods in Photoshop yield varying results. Experiment with Bicubic Smoother, Bicubic Sharper, and other options to find the method that best suits your specific image and resizing requirements.
d. Monitor File Size: Pay attention to the file size of your resized images. Balancing quality and file size is crucial, especially for web applications where smaller file sizes contribute to faster load times.
e. Stay Mindful of Copyright and Licensing: When resizing images for various applications, be mindful of copyright and licensing restrictions. Ensure that you have the right to use and distribute the resized images according to the specified terms.
XII. Troubleshooting and Common Challenges:
Resizing images may pose challenges, such as pixelation, loss of detail, or unexpected distortions. Familiarize yourself with common issues and employ troubleshooting techniques, such as adjusting the resampling method, utilizing advanced Photoshop tools, or considering alternative resizing approaches to address specific challenges.
XIII. Finalizing and Saving Resized Images:
Once you have achieved the desired dimensions, it’s time to save or export your resized images. Choose the appropriate file format, compression settings, and color mode based on the intended use—whether it’s for online sharing, printing, or archival purposes.
XIV. Advanced Techniques for Creative Resizing:
For users seeking to delve deeper into creative resizing, Photoshop offers advanced techniques. Experiment with layer masks, blending modes, and content-aware scaling to refine your resizing skills and overcome specific challenges. Advanced users can explore Photoshop’s capabilities to achieve unique and artistic resizing effects.
Conclusion:
Mastering the art of image resizing in Adobe Photoshop is a foundational skill for photographers, designers, and creatives working across various mediums. This comprehensive guide has provided a detailed walkthrough of the essential steps, tools, and techniques needed to achieve precision in your resizing endeavors. By understanding the intricacies of the resizing process and leveraging the robust features of Photoshop, you can ensure that your images not only meet specific dimensions but also exude a professional and visually captivating allure. As you embark on your resizing journey, let the versatility of Photoshop be your guiding companion, enabling you to bring your creative visions to life with precision and finesse.


