Navigating the Creative Gateway: A Comprehensive Guide on How to Open Images into Camera Raw
Introduction:
Adobe Camera Raw, an integral component of Adobe Photoshop, stands as a powerful tool for digital photographers and image editors. It allows for nuanced adjustments, enhancements, and optimizations to be made to raw image files before they undergo further processing in Photoshop. This comprehensive guide aims to provide a thorough walkthrough on how to open images into Camera Raw, exploring the intricacies of the interface, tools, and techniques that empower users to unlock the full potential of their raw captures.
Section 1: Understanding Raw Image Files
1.1 Raw vs. JPEG: Differentiating between raw and JPEG files lays the foundation for understanding the importance of Camera Raw. Explore the advantages of shooting in raw format, highlighting the flexibility it offers in post-processing compared to the more compressed JPEG.
1.2 Significance of Camera Raw: Delve into why Camera Raw is a critical component of the Adobe Creative Cloud ecosystem. Understand its role in preserving the original data captured by your camera sensor and providing unparalleled control over image adjustments.
Section 2: Opening Images into Camera Raw
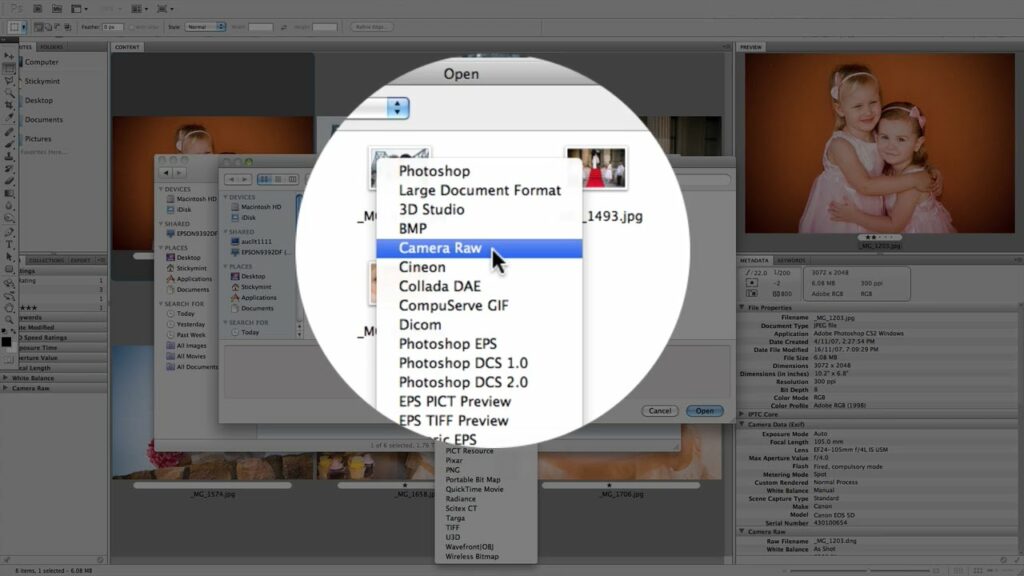
2.1 Initial Setup: Before opening images into Camera Raw, ensure that your Adobe Photoshop software is updated to the latest version. Navigate through the interface to locate the “Open in Camera Raw” option and customize settings such as color space and bit depth.
2.2 Opening Single Images: Learn the step-by-step process of opening a single image into Camera Raw. From navigating to the desired image file to understanding the options available in the Camera Raw interface, this section provides a detailed walkthrough.
2.3 Opening Multiple Images: For users dealing with batches of images, opening multiple files into Camera Raw efficiently is essential. Explore the techniques for selecting and opening multiple raw files simultaneously, streamlining your workflow for efficiency.
Section 3: Navigating the Camera Raw Interface
3.1 Introduction to Camera Raw Interface: Familiarize yourself with the layout of the Camera Raw interface. Understand the arrangement of panels, tools, and options available, ensuring a comfortable and efficient editing experience.
3.2 Basic Panel Adjustments: Dive into the Basic panel, a cornerstone of Camera Raw adjustments. Explore the functionalities of exposure, contrast, highlights, shadows, and other basic adjustments, allowing you to fine-tune the overall look of your images.
3.3 Advanced Editing Options: Uncover the more advanced editing options within Camera Raw, including the Tone Curve, HSL/Grayscale, Split Toning, and Detail panels. Gain insights into leveraging these features to achieve precise and creative adjustments.
Section 4: Utilizing Camera Raw Tools
4.1 Crop and Straighten Tool: Explore the Crop and Straighten tool in Camera Raw, enabling you to refine composition, straighten horizons, and crop images with precision before advancing to further editing in Photoshop.
4.2 Adjustment Brush and Graduated Filter: Harness the power of selective adjustments using the Adjustment Brush and Graduated Filter tools in Camera Raw. Learn how to target specific areas of your image for localized enhancements, emphasizing control and creativity.
4.3 Spot Removal and Red Eye Correction: Master the art of spot removal and red-eye correction within Camera Raw. These tools provide efficient solutions for eliminating imperfections and enhancing the overall visual appeal of your raw images.
Section 5: Synchronization and Presets
5.1 Synchronizing Adjustments: When working with a series of images from the same shoot, synchronization becomes a valuable asset. Understand how to synchronize adjustments across multiple images, maintaining consistency and saving time in the editing process.
5.2 Creating and Applying Presets: Explore the world of presets in Camera Raw, allowing you to save customized adjustments for future use. Learn how to create, organize, and apply presets to streamline your editing workflow and achieve a consistent style.
Section 6: Integration with Photoshop
6.1 Opening Edited Images in Photoshop: After completing adjustments in Camera Raw, seamlessly transition to Photoshop for further editing. Understand the process of opening edited images into Photoshop, maintaining the flexibility of non-destructive editing.
6.2 Smart Objects and Smart Filters: Leverage the power of Smart Objects and Smart Filters when moving between Camera Raw and Photoshop. Explore how these features enhance flexibility and allow for additional adjustments without compromising image quality.
Section 7: Saving and Exporting
7.1 Saving Adjustments: Learn how to save your adjustments within Camera Raw for future editing sessions. Understand the options available for saving images in Adobe’s native DNG format or as sidecar XMP files, preserving your editing history.
7.2 Exporting to Different Formats: Delve into the export options provided by Camera Raw. Explore how to export your edited images to various formats, such as JPEG or TIFF, ensuring compatibility with different platforms and applications.
Section 8: Troubleshooting and Tips
8.1 Common Issues and Solutions: Address common challenges users may encounter while working with Camera Raw. This section offers troubleshooting tips for issues such as compatibility, performance, or unexpected behavior within the interface.
8.2 Efficiency Tips: Maximize your efficiency in Camera Raw with a set of tips and tricks. From utilizing keyboard shortcuts to organizing your workflow, these suggestions enhance your overall editing experience.
Conclusion:
Mastering the process of opening images into Camera Raw is a gateway to unlocking the full potential of your raw captures. This comprehensive guide has equipped users with the knowledge and techniques needed to navigate the Camera Raw interface, apply adjustments, and seamlessly integrate with Adobe Photoshop. By understanding the nuances of raw image editing in Camera Raw, photographers and image editors can elevate their creative capabilities, ensuring that each image is a canvas for precision and expression. As you embark on your journey of post-processing, may the insights provided in this guide serve as a compass, guiding you through the intricate landscapes of Adobe Camera Raw and empowering you to transform your raw captures into visual masterpieces.


