The Ultimate Guide to Creating Tables in Adobe Dreamweaver: Mastering Data Organization and Presentation
James May 13, 2024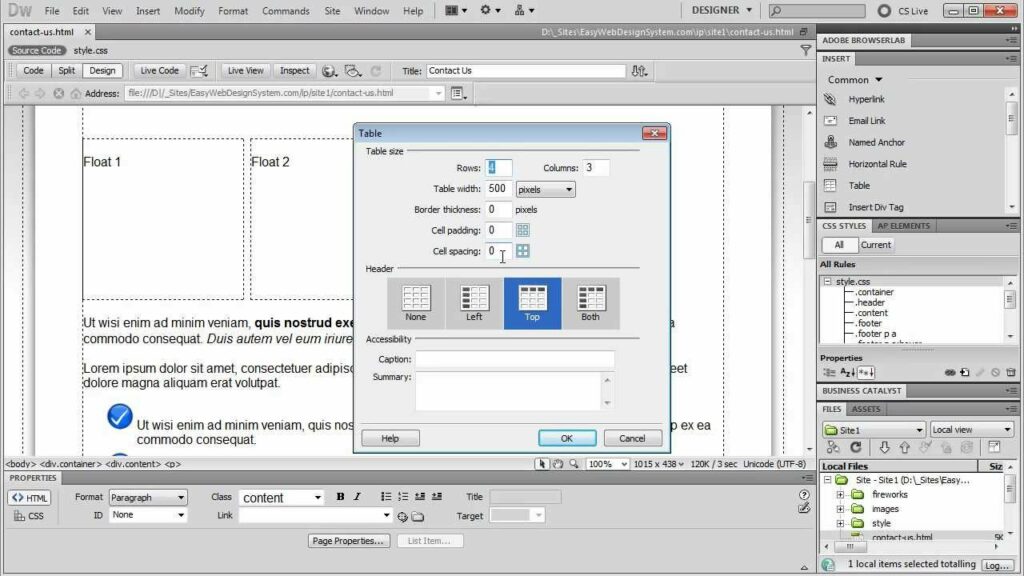
Introduction: Tables are indispensable tools in web design for organizing and presenting data in a structured and visually appealing manner. Adobe Dreamweaver, a powerful web development tool, offers robust features for creating and customizing tables with ease. In this comprehensive guide, we’ll delve into the step-by-step process of creating tables in Adobe Dreamweaver, covering everything from basic table creation to advanced formatting techniques and optimization strategies.
Section 1: Understanding the Importance of Tables in Web Design 1.1 Role of Tables: Discuss the significance of tables in web design, including their versatility in organizing tabular data, layouts, and grid-based designs. 1.2 Data Presentation: Explore how tables facilitate the presentation of complex data sets, enabling users to easily comprehend and analyze information. 1.3 Visual Structure: Highlight the role of tables in establishing visual hierarchy, alignment, and consistency within web page layouts.
Section 2: Getting Started with Tables in Adobe Dreamweaver 2.1 Launching Adobe Dreamweaver: Open Adobe Dreamweaver on your computer to begin creating tables. 2.2 Creating or Opening a Web Page: Create a new HTML file or open an existing web page project where you want to insert tables. 2.3 Navigating to Design View: Switch to Design View in Dreamweaver to visualize the layout of your web page and identify areas for table insertion.
Section 3: Basic Table Creation 3.1 Inserting Tables: Access the Insert panel in Dreamweaver’s toolbar or menu and select the “Table” option to insert a new table into your web page. 3.2 Specifying Table Dimensions: Define the number of rows and columns, as well as the width and height of the table, using the Table Properties dialog box in Dreamweaver. 3.3 Adding Table Headers: Mark the first row or column of the table as headers using the “Header” checkbox in the Table Properties dialog box to enhance accessibility and data clarity.
Section 4: Working with Table Structure 4.1 Adding and Deleting Rows/Columns: Insert or remove rows and columns from the table using the Insert and Delete options in Dreamweaver’s Table menu or context menu. 4.2 Merging and Splitting Cells: Merge adjacent cells to create larger table sections or split merged cells back into individual cells using the Merge and Split options in Dreamweaver. 4.3 Adjusting Cell Padding and Spacing: Modify the padding and spacing between cells in the table using the Cell Padding and Cell Spacing properties in Dreamweaver’s Table Properties dialog box.
Section 5: Formatting Table Elements 5.1 Styling Table Borders: Customize the appearance of table borders, including color, width, and style, using CSS styles or inline styles in Dreamweaver. 5.2 Setting Background Colors: Apply background colors to table cells, rows, or the entire table using CSS styles or the bgcolor attribute in Dreamweaver. 5.3 Aligning Table Content: Align text and other content within table cells horizontally and vertically using CSS styles or HTML attributes such as align and valign in Dreamweaver.
Section 6: Advanced Table Techniques 6.1 Creating Nested Tables: Insert nested tables within existing table cells to create complex layouts and multi-level structures in Dreamweaver. 6.2 Responsive Tables: Implement responsive table designs in Dreamweaver using CSS techniques such as media queries and flexible table layouts to ensure optimal display on different devices and screen sizes. 6.3 Sorting and Filtering: Integrate JavaScript libraries or plugins into Dreamweaver projects to enable interactive sorting and filtering of table data for enhanced user experience and functionality.
Section 7: Organizing and Managing Tables 7.1 Structuring Data: Organize tabular data logically and hierarchically within tables to facilitate navigation and comprehension for users. 7.2 Naming Conventions: Use descriptive and meaningful names for tables, rows, columns, and headers to improve code readability and maintainability in Dreamweaver projects. 7.3 Accessibility Considerations: Ensure tables are accessible to users with disabilities by providing alternative text, semantic markup, and proper table headers in compliance with web accessibility standards.
Section 8: Testing and Previewing Tables 8.1 Previewing in Browser: Preview your web page containing tables in different web browsers and devices within Dreamweaver to test the appearance and responsiveness of table layouts. 8.2 Browser Compatibility Testing: Test tables across multiple web browsers and browser versions to ensure consistent rendering and compatibility with web standards. 8.3 Accessibility Testing: Conduct accessibility testing of tables in Dreamweaver using screen reader software or browser extensions to ensure they are properly labeled and accessible to all users.
Section 9: Best Practices and Tips 9.1 Minimalist Design: Adopt a minimalist design approach for tables, avoiding excessive formatting and decoration to maintain clarity and focus on content. 9.2 Consistent Styling: Maintain consistency in table styling across your website by using CSS styles or external stylesheets to apply uniform formatting to tables and their elements. 9.3 Mobile Optimization: Optimize table layouts for mobile devices by designing responsive and mobile-friendly table designs that adapt gracefully to smaller screen sizes and touch interactions. 9.4 Documentation and Documentation: Document the structure, content, and purpose of tables in Dreamweaver projects using comments, annotations, or external documentation to facilitate collaboration and future updates.
Section 10: Troubleshooting and FAQs 10.1 Common Table Issues: Address common issues encountered when creating and formatting tables in Dreamweaver, such as misaligned cells, overlapping content, and accessibility errors. 10.2 Frequently Asked Questions: Provide answers to frequently asked questions about creating tables in Adobe Dreamweaver, covering topics such as table layout techniques, data sorting, and responsive design considerations.
Conclusion: By following this comprehensive guide, you’ve mastered the art of creating tables in Adobe Dreamweaver, unlocking endless possibilities for organizing and presenting data on the web. With its intuitive tools and versatile features, Dreamweaver empowers you to create visually stunning and functional table layouts that enhance user experience and engagement. Now, armed with the knowledge and skills, unleash your creativity, experiment with table designs, and elevate your web design to new heights. Happy tabling!


