How to use Windows Update History in Windows 8
Windows Update History in Windows 8 provides users with detailed information about the updates installed on their system, including the date and time of installation, the type of update, and any associated status or errors. Understanding how to access and use Windows Update History is essential for staying informed about the status of updates on your system, troubleshooting update-related issues, and ensuring that your computer remains secure and up-to-date with the latest patches and fixes. In this comprehensive guide, we’ll explore everything you need to know about using Windows Update History in Windows 8, from accessing the update history to interpreting the information provided and troubleshooting common issues.
Accessing Windows Update History:
To access Windows Update History in Windows 8, follow these steps:
- Open Control Panel: Press the Windows key to open the Start menu, then type “Control Panel” in the search bar. Click or tap on “Control Panel” in the search results to open the Control Panel.
- Navigate to Windows Update: In the Control Panel, click or tap on “System and Security,” then select “Windows Update.”
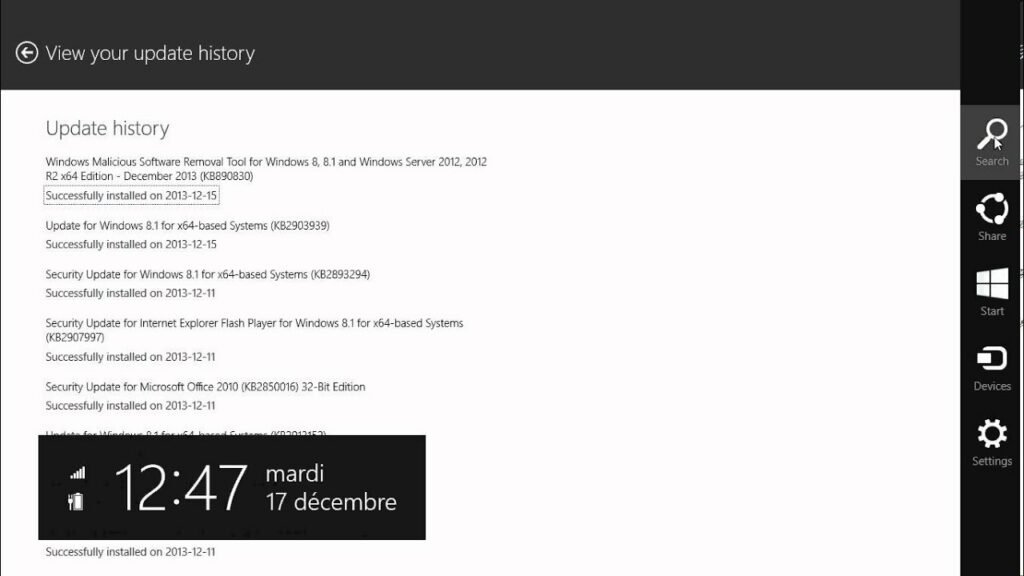
- View Update History: In the Windows Update window, click or tap on “View update history” in the left pane to access the update history.
Understanding Windows Update History:
Windows Update History provides a chronological list of all updates installed on your system, including the following information for each update:
- Update Type: Indicates the type of update, such as “Security Update,” “Cumulative Update,” “Feature Update,” etc.
- KB Number: Unique identifier for the update, typically in the format “KBXXXXXXX.”
- Installation Date and Time: Date and time when the update was installed on your system.
- Status: Indicates whether the update installation was successful or if there were any errors or issues.
- Description: Brief description of the update, including the components or vulnerabilities addressed by the update.
Interpreting Windows Update History:
Interpreting Windows Update History involves understanding the information provided and taking appropriate action based on the status and details of each update. Here are some common scenarios and actions to consider:
- Successful Installations: Updates listed with a status of “Successful” indicate that the update was installed successfully on your system. No further action is required for these updates.
- Failed Installations: Updates listed with a status of “Failed” indicate that the update installation encountered errors or issues. Click or tap on the update to view additional details and error codes. Consider troubleshooting the issue by researching the error code or contacting Microsoft Support for assistance.
- Pending Installations: Updates listed with a status of “Pending” indicate that the update is scheduled to be installed but has not yet been applied. Windows will automatically install pending updates according to the configured update settings.
- Hidden Updates: Users have the option to hide certain updates from being installed on their system. Hidden updates will not appear in Windows Update History. To view or restore hidden updates, click or tap on “Restore hidden updates” in the Windows Update window.
Troubleshooting Windows Update Issues:
If you encounter issues with Windows Update or update installations, consider the following troubleshooting steps:
- Run Windows Update Troubleshooter: Windows includes a built-in troubleshooter for diagnosing and resolving common Windows Update issues. Open Control Panel, navigate to “System and Security” > “Troubleshoot common computer problems,” then click or tap on “Fix problems with Windows Update.”
- Check for System Errors: Review the Event Viewer for any system errors or warnings related to Windows Update. Look for entries under the “Windows Logs” > “System” category that correspond to the time of the update installation or failed update attempts.
- Reset Windows Update Components: If Windows Update is not working correctly, you can reset its components using Command Prompt. Open Command Prompt as an administrator and run the following commands:
net stop wuauserv
 net stop cryptSvc
 net stop bits
 net stop msiserver
 Ren C:\Windows\SoftwareDistribution SoftwareDistribution.old
 Ren C:\Windows\System32\catroot2 Catroot2.old
 net start wuauserv
 net start cryptSvc
 net start bits
 net start msiserver
- Check Disk Space: Ensure that your system has sufficient disk space available for installing updates. Windows Update may fail if there is not enough space to download and install updates.
Conclusion:
Windows Update History in Windows 8 provides users with valuable information about the updates installed on their system, including installation status, update types, and installation dates. By understanding how to access and interpret Windows Update History, users can stay informed about the status of updates on their system, troubleshoot update-related issues, and ensure that their computer remains secure and up-to-date with the latest patches and fixes. Whether you’re monitoring successful installations, troubleshooting failed updates, or reviewing pending updates, Windows Update History is a valuable tool for managing updates and maintaining system reliability and security.


