Unleashing Efficiency: A Comprehensive Guide on How to Use Battery Saver in Windows 10
Introduction
In the dynamic landscape of modern computing, portability is a key consideration, and managing battery life has become a crucial aspect of the user experience. Windows 10, Microsoft’s flagship operating system, addresses this need with the Battery Saver feature. Designed to extend battery life on laptops, tablets, and other mobile devices, Battery Saver conserves energy by adjusting system settings and background activities. In this extensive guide, we will explore the intricacies of using Battery Saver in Windows 10, providing users with insights, tips, and step-by-step instructions to optimize their device’s power consumption.
Understanding Battery Saver in Windows 10
What is Battery Saver? Battery Saver is a built-in feature in Windows 10 that aims to maximize battery life by minimizing background activities and adjusting system settings. When activated, Battery Saver can significantly extend the time a device can run on battery power, making it invaluable for users on the go or those in situations where access to a power source is limited.
Activating Battery Saver
Method 1: Manual Activation:
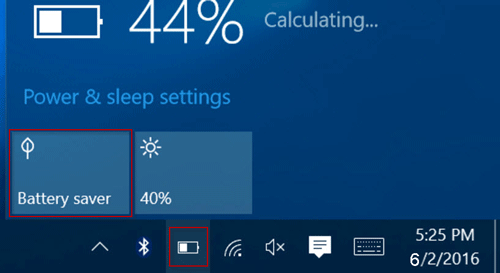
- Click on the Battery Icon:
- Locate the battery icon in the system tray on the taskbar.
- Click on the battery icon to open the battery menu.
- Toggle Battery Saver:
- In the battery menu, look for the “Battery saver” option.
- Click on it to toggle Battery Saver on or off.
Method 2: Settings Menu:
- Open Settings:
- Press
Windows key + Ito open the Settings menu.
- Press
- Go to System Settings:
- Click on “System” in the Settings menu.
- Access Battery Settings:
- In the System settings, select “Battery” from the left-hand menu.
- Toggle Battery Saver:
- On the Battery settings page, toggle the switch under “Battery saver” to turn it on or off.
Automatic Activation:
- Windows 10 can activate Battery Saver automatically when the battery level falls below a certain threshold. This threshold is typically set at 20%, but users can customize it in the battery settings.
Customizing Battery Saver Settings
Windows 10 provides flexibility in customizing how Battery Saver operates. Users can adjust settings to strike a balance between power conservation and performance.
- Change Battery Saver Threshold:
- In the Battery settings (as accessed in Method 2 above), adjust the “Turn battery saver on automatically if my battery falls below” slider to set a custom threshold.
- Configure Battery Saver Settings:
- Click on “Battery usage by app” to see a breakdown of app power consumption.
- Configure individual app settings to optimize power usage.
- Select Battery Saver Mode:
- Customize the power mode that Battery Saver uses by clicking on “Battery saver settings.”
- Choose between “Best battery life” or “Best performance” modes.
- Turn Off Background Apps:
- Disable background apps that consume power unnecessarily. Go to Settings > Privacy > Background apps and toggle off the apps you don’t need running in the background.
Monitoring Battery Usage
Windows 10 provides tools to monitor and analyze battery usage, helping users make informed decisions about their power consumption.
- Battery Usage Graph:
- In the Battery settings, view the battery usage graph to see a historical breakdown of power consumption.
- Battery Report:
- Generate a detailed battery report using the Command Prompt. Open Command Prompt as an administrator and run the command
powercfg /batteryreport. This report provides insights into battery health, capacity, and usage patterns.
- Generate a detailed battery report using the Command Prompt. Open Command Prompt as an administrator and run the command
Additional Tips for Battery Efficiency
- Adjust Screen Brightness:
- Lowering screen brightness is an effective way to conserve battery power. Use the brightness controls on your device or in the Action Center to find an optimal level.
- Manage Power Plans:
- Windows 10 offers different power plans, such as Balanced, Power saver, and High performance. Choose the plan that aligns with your needs, or create a custom plan with specific settings.
- Hibernate Instead of Sleep:
- When not using your device for an extended period, consider hibernating it instead of putting it to sleep. Hibernation uses less power and allows you to resume your work when you return.
- Update Device Drivers:
- Ensure that your device drivers are up to date. Manufacturers often release updates to improve power management and overall performance.
- Use Battery Saver Wisely:
- Activate Battery Saver when you need to maximize battery life, such as during long flights or when you’re away from a power source.
Troubleshooting Battery Issues
- Check Background Processes: Use Task Manager to identify and close unnecessary background processes that may be draining your battery.
- Update Windows: Ensure that your operating system is up to date. Windows updates often include improvements to power management.
- Calibrate Your Battery: Occasionally calibrating your battery by fully charging and discharging it can help the system gauge its capacity accurately.
- Check for Malware: Malware can cause excessive power consumption. Run a full system scan using a reputable antivirus program to ensure your device is clean.
Conclusion
Effectively using Battery Saver in Windows 10 is a strategic approach to managing power consumption on your device. Whether you’re a frequent traveler, a student on the go, or simply looking to optimize your laptop’s battery life, understanding the nuances of Battery Saver and implementing the tips outlined in this comprehensive guide empowers you to strike the right balance between performance and efficiency. By customizing settings, monitoring usage, and incorporating best practices, you can make the most of your device’s battery life and ensure a seamless computing experience, even when power outlets are out of reach.


