Chroma Key Magic: A Comprehensive Guide to Creating Chroma Key Effects in Adobe After Effects
Introduction:
Chroma keying, also known as green screen or blue screen compositing, is a popular technique used in filmmaking, television production, and digital media to replace a specific color (usually green or blue) with another image or video footage. Adobe After Effects offers powerful tools and features for creating chroma key effects, allowing users to seamlessly blend foreground and background elements to create stunning visual compositions. In this extensive guide, we’ll explore the step-by-step process of creating chroma key effects in Adobe After Effects, covering everything from basic techniques to advanced tips and tricks for achieving professional-quality results.
Understanding Chroma Key Effects in Adobe After Effects:
Chroma key effects involve removing a specific color (usually green or blue) from the footage and replacing it with another image or video footage. This process is commonly used to composite actors or objects onto virtual backgrounds, create visual effects, and achieve surreal or fantastical scenes. In Adobe After Effects, chroma key effects can be created using the Keylight effect, which allows users to precisely key out the background color and replace it with another image or video footage.
Key Components of Creating Chroma Key Effects in Adobe After Effects:
Understanding the key components of creating chroma key effects in Adobe After Effects is essential for achieving seamless and professional-quality results. Some key components include:
- Keying: Keying is the process of isolating a specific color range (such as green or blue) from the footage and creating a matte or alpha channel based on that color range. In Adobe After Effects, the Keylight effect is commonly used for keying, allowing users to precisely key out the background color and create a clean and accurate matte.
- Matte: The matte is a grayscale image that represents the transparency or opacity of each pixel in the footage. In chroma key effects, the matte is used to define which parts of the footage are transparent (the background) and which parts are opaque (the foreground). After creating the matte using the Keylight effect, users can use it to composite foreground elements onto a new background.
- Composite: Composite is the process of combining multiple layers of footage or images to create a final visual composition. In chroma key effects, the foreground element (such as an actor or object) is composited onto a new background using the matte created by the Keylight effect. After compositing the foreground and background elements, users can apply additional effects, adjustments, and enhancements to achieve the desired look and feel.
Step-by-Step Guide to Creating Chroma Key Effects in Adobe After Effects:
Follow these step-by-step instructions to create chroma key effects in Adobe After Effects:
- Import Footage:
- Launch Adobe After Effects and create a new project.
- Import the footage containing the foreground element (such as an actor or object) shot against a green or blue screen background by selecting “File” > “Import” > “File” from the menu.
- Apply Keylight Effect:
- Drag and drop the footage layer into the Timeline panel.
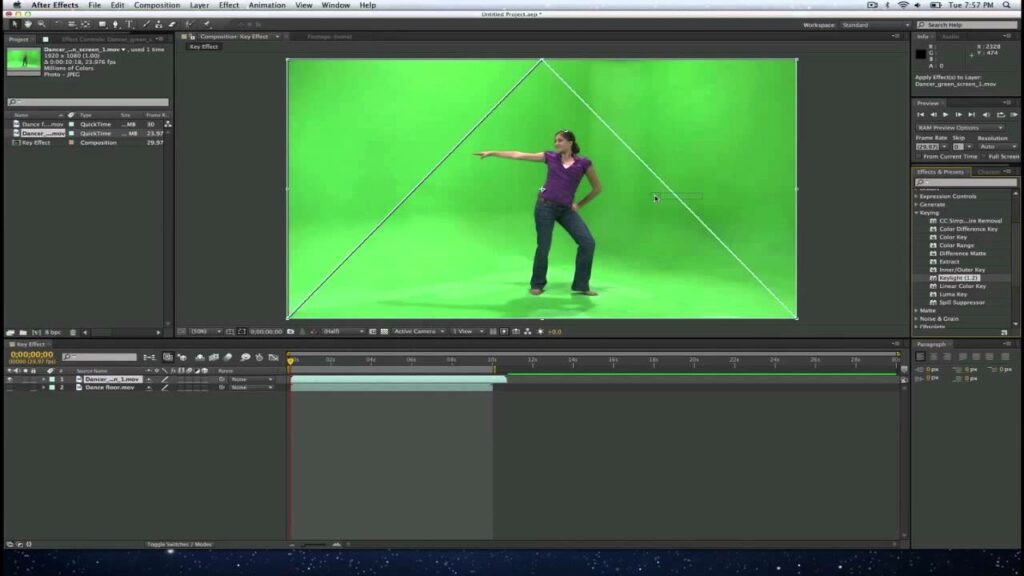
- Apply the Keylight effect to the footage layer by selecting the layer and choosing “Effect” > “Keying” > “Keylight (1.2)” from the menu. The Keylight effect will appear in the Effect Controls panel.
- Select Screen Color:
- In the Effect Controls panel, click the eyedropper tool next to the “Screen Color” parameter to select the color of the background you want to remove. Click on a representative area of the green or blue screen background in the Composition panel to set the screen color.
- Adjust Screen Matte:
- Use the Screen Matte settings in the Effect Controls panel to adjust the matte generated by the Keylight effect. Adjust parameters such as Screen Gain, Screen Balance, Screen Softness, Clip Black, and Clip White to refine the matte and remove any remaining spill or artifacts.
- Create Composite:
- Once you’ve created a clean matte, create a new composition by selecting “Composition” > “New Composition” from the menu. Set the composition settings, including resolution, frame rate, and duration, according to your project requirements.
- Drag and drop the footage layer with the clean matte into the new composition.
- Import or create a new background image or video footage and drag it into the composition below the footage layer with the clean matte.
- Fine-Tune Composite:
- Use the Transform controls in the Composition panel to position, scale, and rotate the foreground element (actor or object) within the composition. Align the foreground element with the background to create a seamless composite.
- Apply additional effects, adjustments, and enhancements to the composition to further refine and enhance the chroma key effect. Experiment with effects such as color correction, blur, glow, and sharpen to achieve the desired look and feel.
- Preview and Refine:
- Preview the chroma key effect in the Composition panel to assess its appearance and quality. Scrub through the timeline or play the composition to see how the foreground element interacts with the background.
- Make any necessary adjustments or refinements to the matte, composite, or effects to achieve the desired result.
- Render and Export:
- Once you’re satisfied with the chroma key effect, render the composition by selecting “Composition” > “Add to Render Queue” from the menu. Configure render settings such as format, codec, resolution, and bitrate, and click “Render” to export the final composition with the chroma key effect.
Best Practices for Creating Chroma Key Effects in Adobe After Effects:
To achieve optimal results when creating chroma key effects in Adobe After Effects, consider the following best practices:
- Use High-Quality Footage: Start with high-quality footage that is well-lit, properly exposed, and free from noise or artifacts. Avoid uneven lighting, shadows, wrinkles, or wrinkles in the green or blue screen background to achieve clean and accurate keying results.
- Select Representative Screen Color: Use the eyedropper tool in the Keylight effect to select a representative area of the green or blue screen background. Avoid selecting areas that contain shadows, reflections, or wrinkles, as they may affect the accuracy of the keying process.
- Refine Matte Settings: Experiment with the Screen Matte settings in the Keylight effect to refine the matte and remove any remaining spill or artifacts. Adjust parameters such as Screen Gain, Screen Balance, Screen Softness, Clip Black, and Clip White to achieve a clean and accurate matte.
- Pay Attention to Detail: Pay attention to detail when creating the composite to ensure a seamless integration of the foreground and background elements. Use the Transform controls to position, scale, and rotate the foreground element within the composition, and apply additional effects and adjustments to enhance the overall appearance of the chroma key effect.
- Test and Iterate: Test the chroma key effect on different devices and screens to ensure that it appears as intended across various viewing platforms. Iterate on the keying settings, composite, and effects based on feedback from viewers or collaborators to refine and improve the visual impact of the chroma key effect.
Conclusion:
In conclusion, creating chroma key effects in Adobe After Effects is a versatile and powerful technique that allows users to seamlessly blend foreground and background elements to create stunning visual compositions. By understanding the key components of creating chroma key effects, mastering keying techniques and controls, and following best practices for creating chroma key effects, you can achieve professional-quality results that enhance the quality and visual appeal of your footage. So, dive into the world of chroma keying, experiment with different techniques and settings, and unlock the full potential of Adobe After Effects to create captivating and visually striking compositions with chroma key effects.


