Mastering the Art of Digital Mastery: A Comprehensive Guide to Creating Silky Smooth Waterfalls in Photoshop
In the realm of digital artistry, few subjects captivate the imagination quite like waterfalls. Their graceful flow, mesmerizing movement, and ethereal beauty have inspired artists for centuries, and in the digital age, photographers and digital artists alike strive to capture and recreate their allure. One technique that allows artists to convey the silky smooth appearance of waterfalls is through digital manipulation in Adobe Photoshop. In this comprehensive guide, we will explore step-by-step methods, expert tips, and creative strategies to help you master the art of creating silky smooth waterfalls in Photoshop, unlocking new realms of creativity and expression.
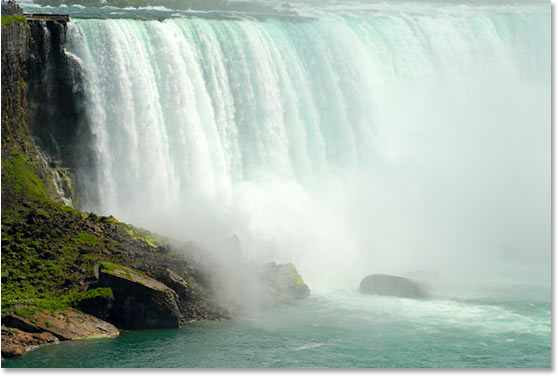
Understanding the Essence of Silky Smooth Waterfalls
Silky smooth waterfalls evoke a sense of tranquility, serenity, and timeless beauty. They represent a harmonious blend of motion and stillness, where the water flows gracefully over rocks and crevices, creating delicate patterns and textures. Capturing and recreating this ethereal quality in digital art requires a combination of technical skill, artistic vision, and creative manipulation. With the right tools and techniques, you can transform ordinary waterfall photos into stunning works of art that convey the enchanting allure of cascading water.
Method 1: Long Exposure Photography
Before diving into the digital manipulation process in Photoshop, it’s essential to start with a high-quality photograph of the waterfall. Long exposure photography is a popular technique for capturing silky smooth waterfalls, as it allows you to create a sense of motion and fluidity in the water. Here’s how to capture a long exposure photograph of a waterfall:
- Use a Tripod: To prevent camera shake and ensure sharpness, mount your camera on a sturdy tripod.
- Select a Slow Shutter Speed: Set your camera to manual mode and choose a slow shutter speed, typically anywhere from a few seconds to several minutes, depending on the desired effect and lighting conditions.
- Adjust Aperture and ISO: To achieve proper exposure, adjust the aperture and ISO settings accordingly. A smaller aperture (higher f-stop) can help control exposure and depth of field, while a lower ISO reduces image noise.
- Use ND Filters: Neutral density (ND) filters are essential for long exposure photography, as they reduce the amount of light entering the camera without affecting color or contrast. Use ND filters to achieve longer shutter speeds and smoother waterfall effects, especially in bright daylight conditions.
- Compose Your Shot: Frame your shot carefully, considering the composition, angle, and focal point of the waterfall. Experiment with different perspectives and compositions to capture the waterfall in its best light.
- Take the Shot: Once everything is set up, press the shutter button to capture the long exposure photograph. Be patient and allow the camera to capture the motion of the waterfall over time.
Method 2: Digital Manipulation in Photoshop
With a high-quality long exposure photograph of the waterfall captured, you can now enhance and refine the silky smooth effect in Photoshop. Here’s how to create silky smooth waterfalls in Photoshop:
- Open Your Image: Start by opening your waterfall photograph in Adobe Photoshop.
- Duplicate the Background Layer: Right-click on the Background layer in the Layers panel and select “Duplicate Layer.” This creates a duplicate of the original image, allowing you to work non-destructively.
- Apply Gaussian Blur: With the duplicated layer selected, go to Filter > Blur > Gaussian Blur. Adjust the Radius slider to apply a subtle blur to the entire image, smoothing out details and enhancing the silky smooth effect of the water.
- Add a Layer Mask: Click on the Layer Mask icon at the bottom of the Layers panel to add a layer mask to the duplicated layer. This allows you to selectively apply the blur effect to specific areas of the image.
- Paint on the Layer Mask: Select the Brush tool (B) and set the foreground color to black. Use a soft brush with low opacity to paint on the layer mask, revealing the sharp details of the waterfall while retaining the blurred effect in other areas.
- Adjust Opacity and Blend Mode: Fine-tune the overall effect by adjusting the opacity and blend mode of the duplicated layer. Experiment with different blend modes, such as Soft Light or Overlay, to enhance contrast and saturation.
- Final Touches and Adjustments: Once you’re satisfied with the overall effect, consider making additional adjustments to color, contrast, and saturation to further enhance the image. Use adjustment layers such as Levels, Curves, or Hue/Saturation to fine-tune the appearance of the waterfall and surrounding environment.
Method 3: Incorporating Texture Overlays
For added depth and visual interest, consider incorporating texture overlays into your silky smooth waterfall images. Texture overlays can introduce subtle patterns, shapes, and details that enhance the overall aesthetic appeal of the image. Here’s how to incorporate texture overlays in Photoshop:
- Open Your Image and Texture Overlay: Start by opening your waterfall photograph in Photoshop. Then, open the texture overlay image you wish to use.
- Place Texture Overlay: Drag and drop the texture overlay image onto your waterfall photograph. Resize and position the overlay layer as desired.
- Blend Mode and Opacity: Experiment with different blend modes and opacity levels to blend the texture overlay seamlessly into the image. Overlay, Soft Light, and Multiply are popular blend modes for texture overlays.
- Layer Mask and Brush Tool: Add a layer mask to the texture overlay layer and use the Brush tool (B) to paint on the mask, selectively revealing or concealing parts of the texture overlay. This allows you to control the areas where the texture appears, ensuring a natural and harmonious integration with the waterfall image.
- Adjustment Layers: Use adjustment layers to fine-tune the appearance of the texture overlay and overall image. Adjustments to brightness, contrast, and color can help unify the texture overlay with the underlying image, creating a cohesive and visually appealing result.
Conclusion
In conclusion, creating silky smooth waterfalls in Photoshop is a rewarding and creative process that allows you to capture the enchanting beauty of cascading water in digital form. By combining long exposure photography techniques with digital manipulation in Photoshop, you can transform ordinary waterfall photographs into stunning works of art that evoke a sense of tranquility, serenity, and timeless beauty. Whether you’re a photographer, digital artist, or enthusiast, mastering the art of creating silky smooth waterfalls opens up new realms of creativity and expression, allowing you to convey the mesmerizing allure of nature’s most captivating wonders with precision and artistry. With patience, practice, and attention to detail, you can unleash your creativity and create digital masterpieces that inspire awe and admiration for the beauty of the natural world.


