Mastering Visual Effects: A Comprehensive Guide to Creating Lens Flare Effects in Adobe After Effects
Introduction: Lens flare effects are a popular visual enhancement used in photography, cinematography, and motion graphics to add depth, drama, and visual interest to images and videos. Adobe After Effects provides a versatile set of tools and features for creating stunning lens flare effects, allowing designers and filmmakers to emulate the natural optical phenomena caused by light scattering within a camera lens. In this comprehensive guide, we will explore the step-by-step process of creating lens flare effects in Adobe After Effects, from understanding the principles of lens flares to applying advanced techniques for customization and animation.
Understanding Lens Flare Effects: Lens flares occur when light enters a camera lens and interacts with the glass elements and coatings, resulting in reflections, refractions, and scattering that produce bright, colorful artifacts in the image. These artifacts manifest as streaks, halos, and bursts of light that enhance the visual impact and atmosphere of photographs and videos. In After Effects, lens flare effects can be created using a combination of light sources, blending modes, and optical elements to simulate the appearance and behavior of real lens flares.
Step 1: Setting Up the Project The first step in creating lens flare effects in After Effects is to set up the project and create a new composition. Define the dimensions, duration, frame rate, and other settings according to your project requirements. Import any footage, images, or assets you plan to use in the composition and arrange them in the timeline as needed.
Step 2: Adding Light Sources Lens flares are typically generated by bright light sources within the frame, such as the sun, artificial lights, or reflections. To create lens flare effects, start by adding one or more light sources to the composition. This could be a solid layer with a bright color or a light emitter such as a point light or spotlight. Position the light sources where you want the lens flares to appear in the frame.
Step 3: Applying Optical Flares Plugin (Optional) One of the most popular tools for creating lens flare effects in After Effects is the Optical Flares plugin by Video Copilot. This powerful plugin offers a wide range of customizable lens flare presets and parameters, allowing users to create realistic and dynamic lens flare effects with ease. If you have the Optical Flares plugin installed, apply it to a new solid layer in the composition and customize the settings to create the desired lens flare effect.
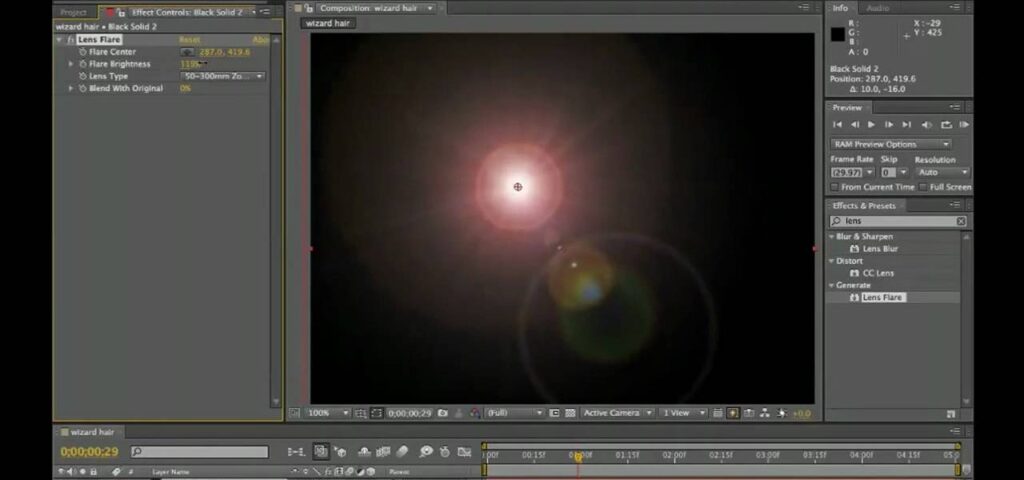
Step 4: Using the Lens Flare Effect If you don’t have the Optical Flares plugin or prefer to use built-in effects, After Effects offers a native Lens Flare effect that can be used to create basic lens flare effects. Apply the Lens Flare effect to a new solid layer in the composition and adjust the settings in the Effect Controls panel to customize the appearance and behavior of the lens flare. Experiment with parameters such as brightness, size, and color to achieve the desired look and feel of the lens flare effect.
Step 5: Positioning and Blending Once you’ve applied the lens flare effect, position it in the composition to align with the light sources in the footage or image. Use the Transform controls to adjust the position, scale, rotation, and opacity of the lens flare effect to achieve the desired placement and intensity. Experiment with blending modes such as Screen, Add, or Lighten to blend the lens flare effect with the background and create natural-looking interactions between the light sources and the lens flare.
Step 6: Customizing Lens Flare Elements To create more realistic and dynamic lens flare effects, customize the individual elements of the lens flare, such as streaks, rings, and halos. After Effects offers a variety of tools and effects for customizing lens flare elements, including masks, shape layers, and effects like Glow and Blur. Use masks to isolate and shape specific elements of the lens flare, such as streaks or rings, and apply effects to enhance their appearance and impact.
Step 7: Animating Lens Flare Movement To add movement and dynamism to the lens flare effect, animate its position, scale, rotation, and intensity over time. Use keyframes to set the initial parameters of the lens flare effect at the beginning of the animation, then move forward in time and adjust the parameters to create dynamic motion and variation. Experiment with different animation curves and timing to achieve smooth and natural-looking movement that complements the action and pacing of the footage.
Step 8: Adding Realism with Optical Elements For added realism, consider incorporating optical elements such as lens artifacts, dust particles, or lens distortion into the lens flare effect. Use effects like Fractal Noise or Grain to generate organic textures and imperfections that mimic the characteristics of camera lenses. Apply effects like Lens Distortion or Optics Compensation to simulate the distortion and aberrations caused by different types of lenses, adding depth and authenticity to the lens flare effect.
Step 9: Fine-Tuning and Previewing As you work on your lens flare effect, be sure to preview your animation regularly to assess its visual impact and quality. Play through the animation in real-time, making note of any areas that may need further refinement or adjustment. Take advantage of After Effects’ real-time playback capabilities to iterate on your design and make adjustments as needed to achieve the desired result.
Step 10: Rendering and Exporting Once you’re satisfied with your lens flare effect animation, it’s time to render and export the composition for use in your video projects. In After Effects, select “Composition” > “Add to Render Queue” to add the composition to the render queue. Configure the render settings, such as output format, resolution, and codec options, and click “Render” to export the final video with the lens flare effect applied.
Conclusion: Creating lens flare effects in Adobe After Effects offers a versatile and powerful tool for adding depth, drama, and visual interest to motion graphics and video projects. By mastering the fundamentals of lens flare effects and exploring advanced techniques for customization and animation, you can unleash your creativity and bring your visual compositions to life. Whether used for creating cinematic atmosphere, enhancing dramatic lighting, or adding dynamic energy to motion graphics, lens flare effects offer endless possibilities for enhancing the visual storytelling and immersive experience of your compositions. Experiment with different settings, techniques, and applications to discover your unique artistic voice and create captivating lens flare animations that captivate and inspire audiences.


