Seamless Sequencing: A Detailed Guide on Switching Angles in Multicam Editing with DaVinci Resolve
Introduction:
Multicam editing, a technique utilized across various video production genres, empowers editors to weave together multiple camera angles seamlessly, fostering dynamic and engaging visual narratives. DaVinci Resolve, renowned for its robust editing capabilities, offers intuitive tools for executing multicam edits with precision and efficiency. Central to this process is the ability to switch between different camera angles seamlessly, ensuring fluidity and coherence in the final sequence. In this extensive guide, we will explore the intricacies of switching angles in multicam editing with DaVinci Resolve, providing a comprehensive roadmap to mastering this essential skill.
Understanding Angle Switching in Multicam Editing:
Before delving into the specifics of switching angles in multicam editing with DaVinci Resolve, it’s imperative to grasp the foundational concepts underpinning this technique.
- The Essence of Angle Switching:
- Angle switching refers to the process of transitioning between different camera angles within a multicam sequence. This technique allows editors to infuse variety, perspective, and visual interest into their edits, enhancing storytelling and viewer engagement.
- Importance of Seamless Transitions:
- Seamless angle switching is paramount in multicam editing, as it ensures continuity, coherence, and fluidity in the visual narrative. Smooth transitions between camera angles maintain viewer immersion, minimize distractions, and elevate the overall viewing experience.
Now that we understand the significance of angle switching, let’s explore how to execute this technique effectively in DaVinci Resolve.
Switching Angles in Multicam Editing with DaVinci Resolve:
DaVinci Resolve provides a comprehensive suite of tools and functionalities for switching angles in multicam editing, offering editors the flexibility and precision needed to craft seamless and captivating sequences. Let’s delve into the step-by-step process of switching angles in multicam editing with DaVinci Resolve:
- Preparing Your Multicam Sequence:
- Before switching angles, ensure that your multicam sequence is properly prepared and organized within DaVinci Resolve. This includes synchronizing multiple camera angles, aligning audio tracks, and structuring the timeline for efficient editing.
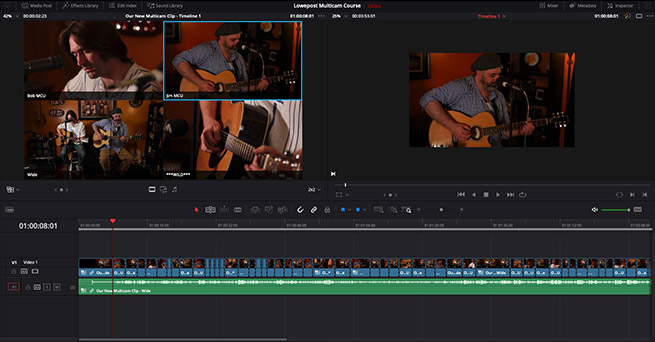
- Accessing the Multicam Viewer:
- Open your multicam sequence in the Multicam Viewer within DaVinci Resolve. The Multicam Viewer provides a comprehensive overview of all synchronized camera angles, allowing you to preview and switch between angles seamlessly.
- Choosing Angle Switching Methods:
- DaVinci Resolve offers multiple methods for switching between camera angles within the Multicam Viewer:
- Mouse Click: Click on the desired camera angle within the Multicam Viewer to switch to that angle instantaneously.
- Keyboard Shortcuts: Utilize keyboard shortcuts to switch between camera angles quickly and efficiently. DaVinci Resolve provides customizable keyboard shortcuts for angle switching, allowing editors to tailor their workflow to their preferences.
- Auto-Switching: Enable auto-switching mode within the Multicam Viewer to automatically switch between camera angles based on predefined criteria, such as time intervals or audio cues. Auto-switching streamlines the editing process, particularly for live events or performances where real-time switching is required.
- DaVinci Resolve offers multiple methods for switching between camera angles within the Multicam Viewer:
- Previewing Angle Transitions:
- Before making angle switches in the timeline, preview the transitions between camera angles within the Multicam Viewer to ensure smoothness and coherence. Pay attention to factors such as timing, pacing, and visual continuity to achieve seamless transitions between angles.
- Implementing Angle Switches in the Timeline:
- Once you’re satisfied with the angle switches in the Multicam Viewer, apply them to the timeline within DaVinci Resolve. Use the selected camera angles to create a dynamic and cohesive multicam sequence, incorporating smooth transitions between angles to maintain viewer engagement and immersion.
- Fine-Tuning Angle Transitions:
- After implementing angle switches in the timeline, fine-tune the transitions between camera angles to ensure optimal visual flow and continuity. Adjust transition durations, apply additional effects or transitions as needed, and refine the timing of angle switches to enhance the overall quality of the multicam sequence.
- Reviewing and Iterating:
- Review the multicam sequence in its entirety to evaluate the effectiveness of angle switches and transitions. Iterate on the edit as necessary, making adjustments to timing, pacing, and visual composition to achieve the desired storytelling impact and viewer engagement.
Best Practices for Angle Switching in Multicam Editing:
To achieve optimal results when switching angles in multicam editing with DaVinci Resolve, consider the following best practices:
- Plan Ahead:
- Before executing angle switches, plan your multicam sequence meticulously, considering factors such as camera placement, framing, and timing. Establish a clear vision for the visual narrative and storyboard key moments to guide angle selection and switching decisions.
- Maintain Visual Continuity:
- Ensure visual continuity between camera angles by aligning framing, composition, and movement across shots. Consistent visual elements help maintain viewer immersion and coherence in the multicam sequence, enhancing storytelling impact and overall quality.
- Experiment with Transitions:
- Experiment with different transition effects and techniques to achieve smooth and visually engaging angle switches. Explore options such as cuts, fades, wipes, and dissolves to add variety and dynamism to your multicam sequence, tailoring transitions to suit the tone and pacing of the edit.
- Consider Audio Alignment:
- Pay close attention to audio alignment when switching angles in multicam editing. Synchronize audio tracks from different camera angles to ensure seamless transitions between audio sources, maintaining consistency and clarity in the audiovisual experience.
- Collaborate and Seek Feedback:
- Collaborate closely with directors, producers, or other team members to gather feedback and input on angle switches and transitions. Solicit constructive criticism and iterate on the edit based on feedback to achieve the best possible outcome for your project.
Conclusion:
Angle switching is a fundamental aspect of multicam editing that requires precision, creativity, and attention to detail. With DaVinci Resolve as your creative tool, you have the power to execute seamless and captivating angle switches, enhancing storytelling impact and viewer engagement in your multicam sequences. Experiment with different angle-switching methods, transitions, and effects, and leverage DaVinci Resolve’s intuitive tools and functionalities to bring your vision to life with clarity and coherence. By mastering the art of angle switching in multicam editing, you can elevate your video projects to new heights of excellence and captivate audiences with compelling and immersive visual narratives.


