Unleashing the Power of PowerPoint: The Complete Guide to Editing Images
James March 26, 2024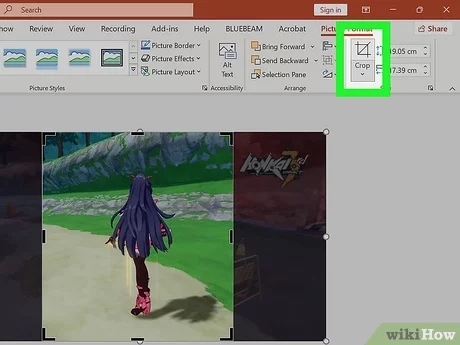
Introduction:
Microsoft PowerPoint, primarily known for creating presentations, offers a surprisingly robust set of image editing tools that often go overlooked. Whether you’re a professional presenter, educator, or creative enthusiast, harnessing the image editing capabilities of PowerPoint can streamline your workflow and elevate the visual impact of your presentations. In this comprehensive guide, we will explore the full range of image editing features available in PowerPoint, offering step-by-step instructions, creative techniques, and practical tips to help you master the art of image editing in PowerPoint.
Understanding Image Editing in PowerPoint:
PowerPoint provides a suite of image editing tools that allow users to perform basic to advanced edits directly within the application. From cropping and resizing to applying filters and effects, PowerPoint offers a versatile set of tools for enhancing and manipulating images. By leveraging these tools effectively, users can create polished and professional-looking visuals to complement their presentations.
Getting Started:
To begin editing images in PowerPoint, follow these simple steps:
- Open PowerPoint: Launch Microsoft PowerPoint on your computer to access the software’s workspace.
- Insert an Image: Click on the “Insert” tab in the ribbon, then select “Pictures” to insert an image from your computer. Alternatively, you can drag and drop an image directly onto the slide.
- Access Image Editing Tools: With the image selected, navigate to the “Picture Format” tab in the ribbon. Here, you’ll find a variety of image editing tools organized into different groups, such as Adjust, Picture Styles, and Artistic Effects.
- Perform Basic Edits:
- Crop: Use the Crop tool to remove unwanted portions of the image and focus on the subject. Click on the Crop tool, then drag the handles to adjust the crop area. Press Enter to apply the crop.
- Resize: Use the Resize tool to adjust the size of the image. Click and drag the handles to resize the image proportionally, or hold the Shift key while dragging to resize non-proportionally.
- Apply Adjustments:
- Brightness and Contrast: Use the Brightness and Contrast tools to adjust the overall brightness and contrast of the image. Drag the sliders to increase or decrease the brightness and contrast levels.
- Color Saturation: Use the Color Saturation tool to adjust the intensity of colors in the image. Drag the slider to the right to increase saturation and make colors more vibrant, or to the left to decrease saturation and create a more muted effect.
- Add Effects:
- Picture Styles: Choose from a variety of preset Picture Styles to apply different visual effects to the image, such as borders, shadows, and reflections.
- Artistic Effects: Apply artistic effects to the image to give it a unique look. Choose from a range of effects such as Pencil Sketch, Watercolor, and Oil Paint.
Creative Techniques:
PowerPoint offers numerous creative techniques for editing images and enhancing their visual impact. Here are some creative techniques to explore:
- Overlay Text: Use PowerPoint’s text tools to overlay text on top of images. Experiment with different fonts, sizes, and colors to create visually appealing text overlays that complement the image.
- Combine Images: Use PowerPoint’s grouping and layering tools to combine multiple images into a single composition. Arrange images on different layers, then adjust the layer order and transparency to create interesting visual effects.
- Apply Filters: Experiment with PowerPoint’s Artistic Effects to apply filters and artistic effects to images. Combine multiple effects to create unique and stylized looks that enhance the overall presentation.
- Create Photo Collages: Use PowerPoint’s grid and alignment tools to create photo collages with multiple images. Arrange images in a grid layout, then adjust spacing and alignment to create a visually pleasing composition.
- Add Annotations: Use PowerPoint’s drawing tools to add annotations and annotations to images. Draw shapes, lines, and arrows directly on the image to highlight key points or add visual interest.
Conclusion:
In conclusion, mastering the image editing capabilities of PowerPoint can greatly enhance the visual impact of your presentations and creative projects. By following the steps outlined in this guide and exploring creative techniques, users can unlock the full potential of PowerPoint’s image editing tools and create polished and professional-looking visuals. Whether you’re a presenter, educator, or creative enthusiast, PowerPoint offers a versatile and intuitive platform for editing images and elevating your presentations to the next level. With practice and experimentation, users can unleash their creativity and create visually stunning presentations that captivate and engage audiences.


