Enhancing Efficiency and Precision: A Comprehensive Guide to Using Markers for Editing Workflow in DaVinci Resolve
Introduction:
In video editing, effective organization and clear communication are key to streamlining the editing process and achieving optimal results. Markers serve as invaluable tools for editors, providing visual reference points, annotations, and cues that facilitate collaboration, streamline workflow, and enhance precision. DaVinci Resolve, renowned for its robust editing capabilities, offers versatile marker functionalities that empower editors to work more efficiently and creatively. In this extensive guide, we’ll delve into the intricacies of using markers for editing workflow in DaVinci Resolve, equipping you with the knowledge and techniques to maximize your editing efficiency and precision.
Understanding Markers in Editing Workflow:
Before exploring the specifics of using markers in DaVinci Resolve, let’s establish a foundational understanding of what markers are and why they are essential for the editing process.
- What are Markers?
- Markers are visual indicators or annotations placed on the timeline to denote specific points of interest or instructions during the editing process. They can be used to mark key events, identify edits or revisions, provide feedback or notes, and coordinate timing with audio or visual cues.
- Why Use Markers?
- Markers play a crucial role in enhancing organization, communication, and efficiency in the editing workflow. By providing clear reference points and annotations, markers help editors stay organized, collaborate effectively with team members, and streamline the editing process. They also serve as visual cues for coordinating timing, transitions, and effects with precision, ensuring a cohesive and polished final product.
Now that we understand the importance of markers let’s explore how to leverage them effectively in DaVinci Resolve.
Using Markers for Editing Workflow in DaVinci Resolve:
DaVinci Resolve offers a comprehensive set of marker functionalities that empower editors to work more efficiently and creatively. Let’s delve into the step-by-step process of using markers for editing workflow in DaVinci Resolve:
- Adding Markers:
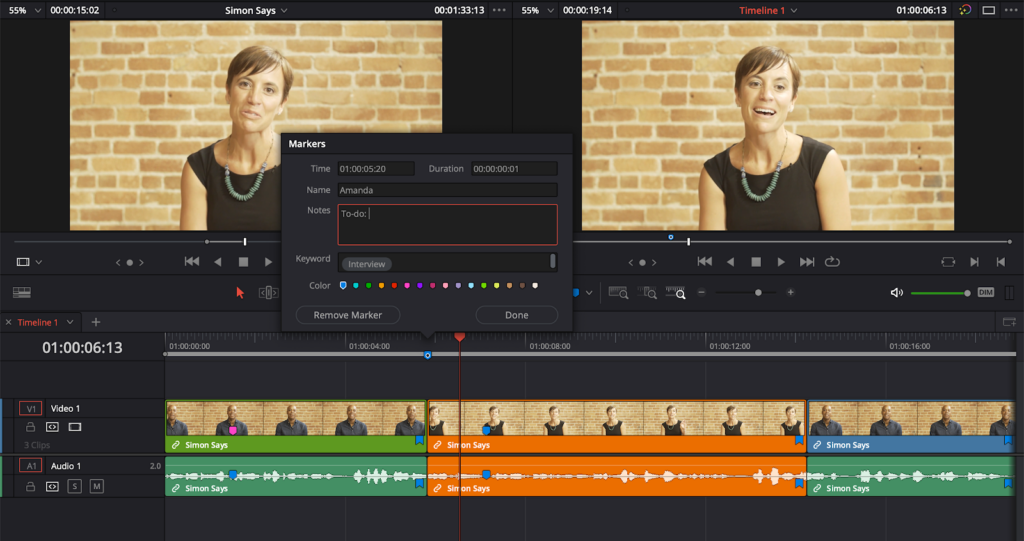
- To add a marker to the timeline in DaVinci Resolve, navigate to the desired frame or position in the timeline and press the “M” key on your keyboard. Alternatively, you can right-click on the timeline and select “Add Marker” from the context menu. Specify a name, color, and any additional comments or annotations for the marker as needed.
- Types of Markers:
- DaVinci Resolve offers various types of markers to suit different purposes and workflows:
- Standard Markers: Standard markers are used to denote specific points of interest or events in the timeline, such as scene changes, keyframes, or important moments.
- Chapter Markers: Chapter markers are used to define chapter points or sections within a video project, facilitating navigation and organization for viewers.
- Flag Markers: Flag markers are used to indicate errors, revisions, or areas of concern in the timeline, alerting editors to potential issues that require attention.
- Custom Markers: Custom markers allow editors to create personalized markers with custom labels, colors, and annotations tailored to their specific workflow and preferences.
- DaVinci Resolve offers various types of markers to suit different purposes and workflows:
- Editing with Markers:
- Once markers are added to the timeline, they can be used to facilitate various editing tasks and workflows:
- Navigation: Use markers as visual cues to navigate quickly between key points in the timeline, allowing for efficient review, playback, and editing.
- Organization: Use markers to organize and structure your timeline by marking key events, scenes, or sections for easy reference and identification.
- Collaboration: Share markers with team members or collaborators to communicate feedback, instructions, or revisions effectively, fostering collaboration and facilitating revisions.
- Timing and Synchronization: Use markers to coordinate timing and synchronization with audio or visual cues, ensuring precise alignment of edits, transitions, and effects with key events or moments in the timeline.
- Once markers are added to the timeline, they can be used to facilitate various editing tasks and workflows:
- Editing Efficiency Tips:
- To maximize editing efficiency with markers in DaVinci Resolve, consider the following tips and techniques:
- Keyboard Shortcuts: Familiarize yourself with keyboard shortcuts for adding, navigating, and editing markers in DaVinci Resolve to streamline your workflow and save time.
- Color Coding: Use different colors for markers to denote different types of events, instructions, or revisions, making it easier to visually differentiate between them and maintain organization.
- Naming Conventions: Adopt consistent naming conventions for markers to ensure clarity and consistency across your projects. Use descriptive labels that convey the purpose or significance of each marker, making it easier to understand and reference them during the editing process.
- To maximize editing efficiency with markers in DaVinci Resolve, consider the following tips and techniques:
- Exporting Markers:
- When exporting your project from DaVinci Resolve, you can choose to include markers in the exported file for reference or collaboration purposes. Simply enable the option to export markers in the export settings dialog, ensuring that markers are preserved and accessible to collaborators or clients.
Best Practices for Using Markers:
To achieve optimal results when using markers for editing workflow in DaVinci Resolve, consider the following best practices:
- Plan Ahead:
- Before adding markers to your timeline, take time to plan and strategize their placement based on the specific requirements and objectives of your project. Identify key events, transitions, or revisions that warrant markers and establish a clear purpose and naming convention for each marker.
- Keep it Organized:
- Maintain organization and consistency in your use of markers by adopting standardized naming conventions, color coding, and labeling practices. This will ensure that markers are easy to understand, navigate, and reference throughout the editing process, enhancing efficiency and clarity.
- Communicate Effectively:
- Use markers as communication tools to convey feedback, instructions, or revisions effectively to team members or collaborators. Include clear and concise annotations or comments with each marker to provide context and guidance, facilitating collaboration and ensuring that feedback is understood and addressed accurately.
- Review and Iterate:
- Regularly review and iterate on your use of markers throughout the editing process to ensure that they remain relevant, accurate, and effective. Remove or update obsolete markers, refine labeling or annotations as needed, and adapt your marker strategy based on evolving project requirements or feedback from collaborators.
Conclusion:
Markers are invaluable tools for enhancing organization, communication, and efficiency in the editing workflow in DaVinci Resolve. By leveraging markers effectively, editors can streamline their workflow, collaborate more efficiently with team members, and achieve greater precision and clarity in their edits. Experiment with different types of markers, explore advanced techniques and workflows, and incorporate markers into your editing process to unlock new levels of efficiency and creativity in your video projects. With DaVinci Resolve as your creative tool and markers as your guiding beacons, you have the power to navigate the editing process with confidence and precision, ultimately achieving your vision with clarity and coherence.
