Mastering Transitions in Microsoft PowerPoint 2016: Enhance Your Presentations with Seamless Visual Effects

Introduction:
Microsoft PowerPoint 2016 offers a plethora of features to help users create captivating and engaging presentations. Among these features, transitions play a crucial role in adding visual appeal, creating smooth flow, and guiding the audience’s attention from one slide to the next. In this extensive guide, we will delve deep into the world of transitions in PowerPoint 2016, exploring the various options, customization settings, and best practices to help you create polished and professional presentations that leave a lasting impression.
Understanding Transitions in PowerPoint 2016:
Transitions in PowerPoint 2016 refer to the visual effects that occur when moving from one slide to the next during a presentation. These effects can range from simple fades and wipes to more dynamic animations and 3D effects. Transitions serve multiple purposes, including:
- Enhancing Visual Appeal: Transitions add visual interest and dynamism to your presentation, making it more engaging and memorable for the audience.
- Creating Smooth Flow: Transitions help create a seamless flow between slides, preventing abrupt jumps and keeping the audience focused and engaged.
- Guiding Attention: Transitions can be used strategically to draw the audience’s attention to key points or elements on the slides, reinforcing the presenter’s message.
Types of Transitions in PowerPoint 2016:
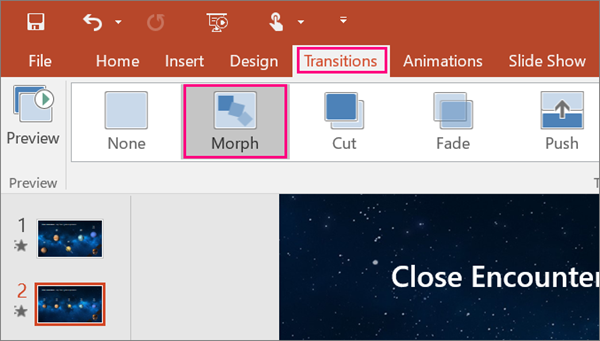
PowerPoint 2016 offers a wide range of transition effects to choose from, each with its unique visual style and impact. Some of the most commonly used transition effects include:
- Fade: The Fade transition gradually fades out the current slide while fading in the next slide, creating a smooth and subtle transition between slides.
- Push: The Push transition pushes the current slide off the screen while simultaneously pushing the next slide into view from a specified direction, such as left or right.
- Wipe: The Wipe transition wipes the current slide off the screen while revealing the next slide from a specified direction, such as top or bottom.
- Zoom: The Zoom transition zooms in on the current slide before zooming out to reveal the next slide, creating a dynamic and immersive effect.
- Morph: The Morph transition smoothly morphs the elements from one slide into the corresponding elements on the next slide, creating a seamless transition between slides.
Customizing Transitions in PowerPoint 2016:
PowerPoint 2016 allows users to customize transitions to suit their preferences and presentation style. Some customization options include:
- Duration: Adjust the duration of the transition to control how quickly or slowly it occurs. Longer durations can create a more dramatic effect, while shorter durations are more subtle.
- Direction: For transitions such as Push and Wipe, specify the direction from which the next slide will enter the screen, such as left, right, top, or bottom.
- Sound Effects: Add sound effects to transitions to further enhance the audiovisual experience of your presentation. Choose from a selection of built-in sound effects or add your custom sounds.
- Advance Slide: Specify when the transition occurs, such as on mouse click, automatically after a set time, or synchronized with narration.
Best Practices for Using Transitions in PowerPoint 2016:
- Keep it Simple: Avoid using too many different transition effects in your presentation, as this can be distracting and overwhelming for the audience. Stick to one or two simple and consistent transitions throughout your presentation.
- Match the Transition to the Content: Choose transition effects that complement the content and tone of your presentation. For example, use subtle fades or wipes for professional presentations, while dynamic zooms or morphs may be more suitable for creative or multimedia presentations.
- Use Transitions Sparingly: While transitions can add visual interest, overusing them can detract from the content of your presentation. Use transitions strategically to highlight key points or transitions between sections, rather than applying them to every slide.
- Preview and Practice: Before delivering your presentation, preview the transitions to ensure they work as intended and complement the flow of your content. Practice your presentation to become familiar with the timing and sequence of transitions.
Conclusion:
Transitions in Microsoft PowerPoint 2016 are powerful tools for enhancing the visual appeal, flow, and engagement of your presentations. By understanding the various types of transitions, customization options, and best practices outlined in this guide, you can create polished and professional presentations that captivate and impress your audience. Whether you’re delivering a business pitch, academic lecture, or creative showcase, mastering transitions in PowerPoint 2016 will help you communicate your message effectively and leave a lasting impression on your audience.


